$ oc login https://api.cluster.chp5-test.npocloud.nl:6443

Authentication required for https://api.cluster.chp5-test.npocloud.nl:6443 (openshift)
Username: UserName
Password:
Login successful.

You don't have any projects. You can try to create a new project, by running

    oc new-project <projectname>

Welcome! See 'oc help' to get started.
Welcome
Welcome to the NPO CHP Workshop for CHP5
This workshop works is different than our previous workshop. We will take you through CHP5 in a number of individual labs.
Each lab is done in a new and clean project, and the projects should be deleted after you finished the lab.
Notices
If you already have an account on one of our OpenShift platforms, you have been instructed to start the names of your project with <omroep>-, in this workshop we ask you to start the names of the project with workshop-:
The content of this workshop is somewhat outdated. The first 7 chapters ( except 6 ) have been updated to CHP5. For the other chapters probably some creativity is needed, using different apps and examples than the ones used in this document. If you need help with this you can contact support.
Support
If you are running into trouble, please contact our Hosting Team using slack or our support site: https://support.npohosting.nl. Make sure that you include the following:
-
Your username
-
The name of the project
-
Which lab you are trying
Setup client tools
Installing OpenShift Container Platform Command-line Interface (CLI)
-
Installing the oc Administer CLI (OpenShift Command-line Interface)
-
You can download the latest version here: https://mirror.openshift.com/pub/openshift-v4/clients/ocp/latest/
-
Installing odo Developer CLI (OpenShift Do Command-line Interface)
After installing the client tools, you can login to the OpenShift CLI usign the oc login command:
If you have 2FA Authentication enabled on your account, you will have to login to the webconsole first.
You can login through https://console.chp5-test.npocloud.nl. After logging in, select your (user)name on the top-right corner and then select "Copy Login Command"
Now select "Display Token". Here you can copy the login command and paste in your terminal.
Other Prerequesits
-
Git
Next using OpenShift Developer Console
Explore the Developer Console
Prerequisites
-
You have access to our OpenShift Console: https:///console.chp5-test.npocloud.nl/
-
You have credentials to log in. Please contact NPO Hosting if you don’t have these already.
Introduction
OpenShift 4.x provides a Developer Web Console for anyone trying to deploy and manage applications to the cluster. This GUI is different from Administration Console that is typically used by cluster administrators. Developer Web Console employed by application developers and deployers, application operations, or anyone with an application focus.
Explore
-
Paste the Web Console URL in the browser. It will ask you to log in.
-
Login with your credentials, i.e.,
usernameandpasswordassigned to you. -
Once you log in, you’ll see a page similar to what shown below. Notice your
usernameon the right top corner. Also, notice the menu bar on the left.
-
Select Create Project button item to create a new project. Name the project based on your
name, e.g.workshop-tim. Project names are unique in a multi-user cluster. -
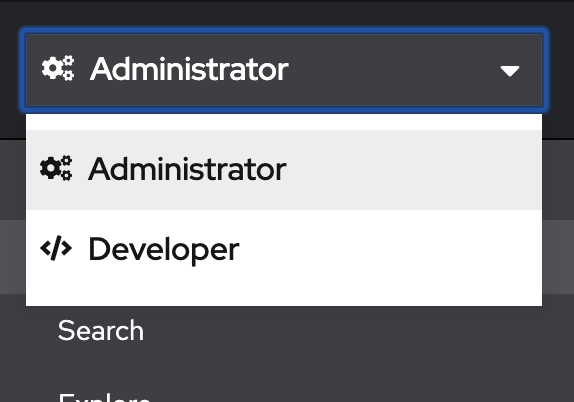
You can now toggle to Developer view by pressing on the
Administratordropdown and selectingDeveloper. In this lab we will focus on Developer view.
-
You will now see the developer console. This console has a Menu on the left, and the main area shows different ways to deploy workloads in this project.

-
Take your time and explore menu options.
-
Topology shows the applications deployed. Since we haven’t deployed anything yet, it just shows different ways to deploy workloads in this project.
-
Builds shows the OpenShift build configurations. Once a build configuration created, you can execute, view, and edit build configuration and view build logs.
-
Pipelines take you to the OpenShift pipeline. You can view, edit, and run tekton pipelines. Also, review the related pipeline resources, tasks, and logs.
-
Advanced Section includes a bunch of subsections.
-
Project Details shows the project’s status, inventory of all the objects deployed in this project, utilization of CPU, memory, resource quotas, and events.
-
Project Access allows you to add members and change their permissions.
-
Metrics allow you to query project metrics.
-
Search allows you to search for all the artifacts in this project.
-
Events show a stream of project events.
-
-
Review
In this lab, we logged into the cluster using Web Console and understood the layout and navigation of Developer console which is typically used by the application teams (developers, deployers, and builders)
Next Deploy an Application
Deploy an App using the Webconsole
Prerequisites
-
Access to an OpenShift Cluster and a Web Console URL.
Introduction
There are different ways to deploy workloads to an openshift cluster. Here we will explore deploying a simple web application using OpenShift developer console.
What happens when we deploy an application?
OpenShift creates a bunch of objects when you deploy an application. Some key objects:
-
Build Configuration: If you are starting with source code or a dockerfile, the build configuration shows you where the source code is and the strategy to build the application, parameters to be passed to your build and more. You can explore and edit openshift build configuration YAML using web console, if you desire to change it. Each time you start a build, it runs a pod inside which the application build happens. The result of the build is typically a container image that gets saved in a container registry (integrated registry on your openshift cluster by default)
-
Deployment or Deployment Configuration: DeploymentConfig is an openshift concept that predates kubernetes deployment. The DeploymentConfig is deprecated, we don’t use these anymore for new deployments and all old DeploymentConfigs will be converted to deployments. These are the configurations for how your application is deployed, the environment variables to be passed to our container, external configurations to be passed via configmaps, storage mounts etc. This defines the configuration for your running application.
-
Service Kubernetes service frontends a set of pods and proxies traffic to your application pods.
-
Route OpenShift route is ingress to your application. Creation of route object results in a URL being added to the OpenShift router which becomes an entry point for your application from outside the cluster.
-
Ingress is a Kubernetes native way to create ingress to your application. An openshift Route also creates an Ingress object. We prefer to use Ingress because they are Kubernets native. In this workshop routes will be used though.
In addition to the above, it may create Secrets, ConfigMaps, ServiceAccounts and other objects too.
When you explore a deployed application, make sure you look at the corresponding YAMLs for each of these objects.
Deploy an application
-
Log into Developer Console as explained here and create a project, if you have not already done so.
-
Klik on "Add page"
-
Choose "Create applications using samples"
-
Choose Httpd.
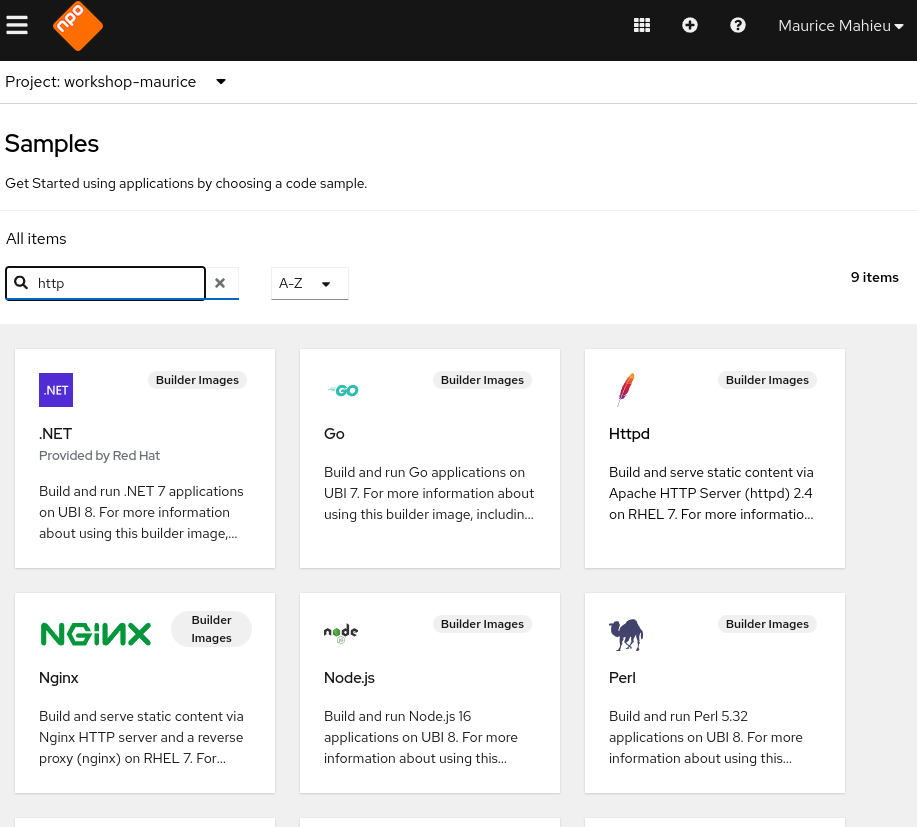
Click on Create button
-
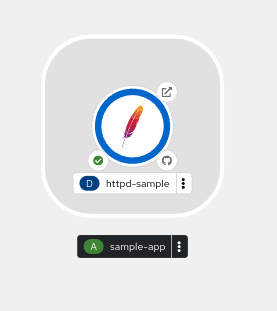
You will notice the topology view now changes to what is show in the figure below:
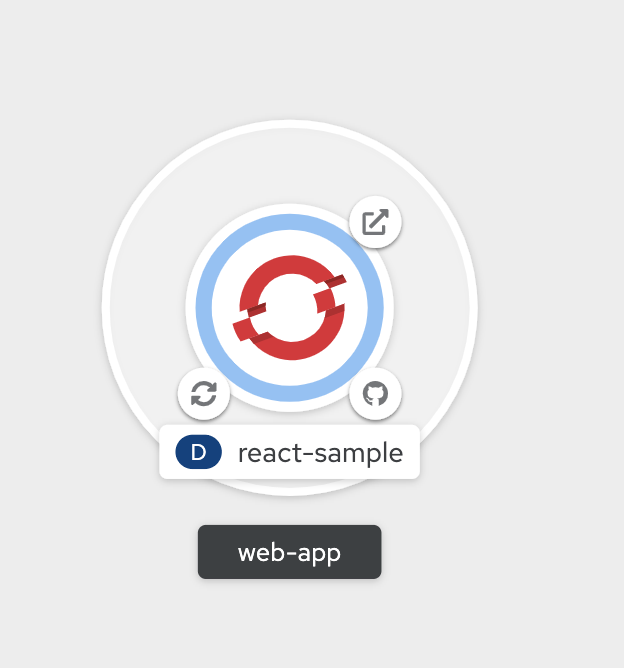
-
There are two circles here
-
Outer circle represents the application, It shows
sample-app** -
Inner circle represents the deployment named
httpd-sample
-
-
Hover over the icon on different corners. You will notice
-
Build Running . Clicking in this will show build logs.
 -
Edit Source will take you to source code
 -
Open URL will open the URL/Route for this app on a new browser tab
-
-
Click on
that takes you to Build Logs. OpenShift builds run in a pod that comes up and runs a source-to-image build.
Running into Resource Limits
Note: With the new cluster we don't run into resource limits anymore. The text below is still in place with the react-sample-1 as an example for what to do should you run into Resource Limits.
By default the build will fail with an Out of Memory (OOM) error. This is because of our default memory limits.
Make sure you are logged in to the OpenShift console, the instructions can be found in Chapter 2.
Run the following commands to fix the problem, please note that your results may differ.
## Select the project
$ oc project <Your Project>

## Now we need to find the builds
$ oc get builds

NAME             TYPE     FROM          STATUS    STARTED          DURATION
react-sample-1   Source   Git@db8420b   Running   15 seconds ago

## If the build is still running, cancel it first:
$ oc cancel-build react-sample-1

## Afterwards, we need to patch the BuildConfig, which is the name of the build without the "-1"
$ oc patch bc/react-sample --patch '{"spec":{"resources":{"limits":{"memory":"1Gi","cpu":"1000m"}}}}'

## Now, start a new build
$ oc start-build react-sample

## You can check it's status again by running oc get builds
$ oc get builds
NAME             TYPE     FROM          STATUS                       STARTED          DURATION
react-sample-1   Source   Git@db8420b   Cancelled (CancelledBuild)   50 seconds ago   22s
react-sample-2   Source   Git@db8420b   Running                      6 seconds ago
Source-to-Image
Source-to-Image (S2I) process converts your source code into a container image. Builder Image that you chose earlier has the capability to do S2I. Builds do the following:
-
Clone source code from the git repo
-
Generate a Dockerfile
-
Build the source code (example compile the code) and create a binary
-
Execute container build using builder
-
Push the resultant container image into integrated container registry running on OpenShift.
Observe the build logs to note the above steps in the logs.
-
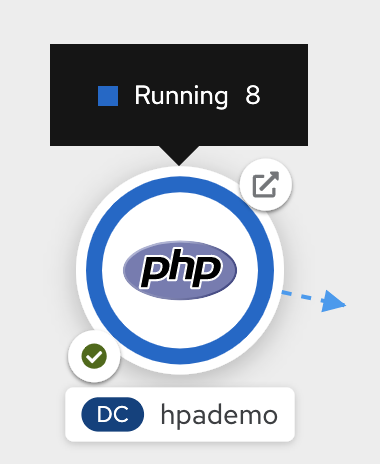
Once the S2I build is complete, deployment runs to deploy the application instance as a pod. At that point you will notice the pod starts running as shown below (hover your mouse pointer over the blue ring).
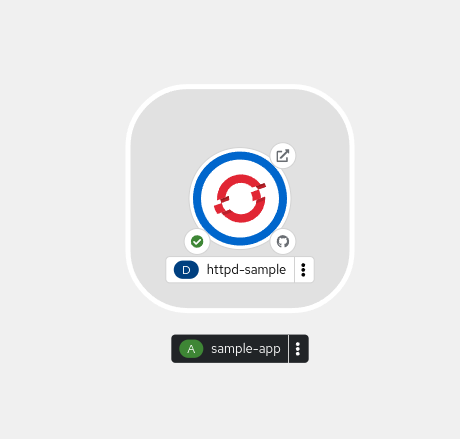
-
Now click on the URL icon on the top right which takes you to the running application in a new browser tab.
You have successfully built and deployed an application using web console!!
Explore your application
-
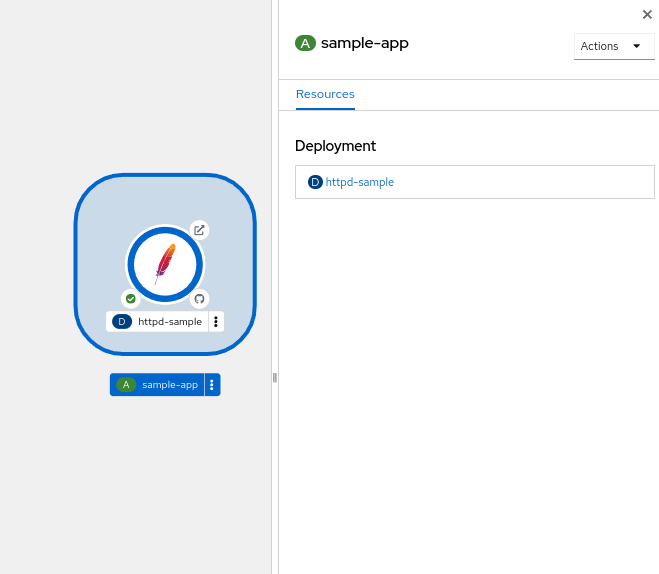
Click on the deployment icon and it will show you details about that application on the right as shown below
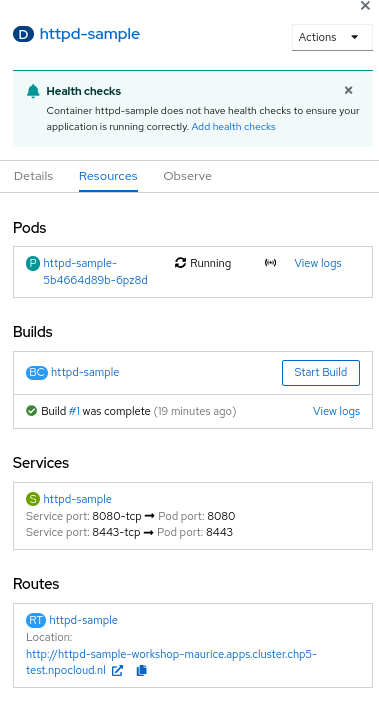
-
Overview tab that shows details of the deployment, number of pods running etc.
-
Actions drop down, allows you to make changes to the deployment. As an example, navigate to Actions→Edit Labels and add a label
app.openshift.io/runtime=apacheand Save. You will notice that the application shows the icon indicating JavaScript based application as shown below.
-
Resources tab allows you to directly get to openshift resources such as Pods, Builds, Services, Route. So it is like a summary for all the objects related to this deployment. Navigate to each of these objects and also look at their YAMLs and understand the options that the WebConsole provides to edit these objects.
Explore Project Menu on the top

-
Project dropdown allows you to switch between the projects and Create new project
-
Applications dropdown allows you to filter the apps in the view, if you deploy multiple applications in this project
-
Shortcuts shows you command shortcuts to accomplish actions such as making a deployment part of an application (by
SHIFT+Drag), connecting application components (byHoverover and drag the arrow) etc. -
You can switch between the Topology view and the List view by clicking on the List icon on the right.
Lot more features will be available very soon on developer console such as * Showing Pod Count * Creating pipelines via console and more
Even if this lab is not updated, you can explore everything on the webconsole at this point.
Delete Application
-
Click on the Application circle. It will show the application details on the right
-
Now select Actions→Delete Application
-
It will prompt you to confirm the application name to delete. Type in the application name
sample-appin my case. -
The application is deleted and you will be back to a blank topology with options to deploy a new app again.
Delete Project
-
Switch back to Administrator Console to view a list of projects
-
Select the menu option on the right end of the project and click on
Delete Project

-
Confirm deletion by typing in the project name and click on Delete button
Summary
In this lab, we learned to deploy an application using OpenShift Developer Console, explored the application details, and cleaned it up.
Deploy an App using the OpenShift CLI
Prerequisites
-
You need API URL to the cluster.
-
You need credentials (UserName and Password) to login to the cluster
-
Login to the cluster running
$ oc login https://api.cluster.chp5-test.npocloud.nl:6443

Authentication required for https://api.cluster.chp5-test.npocloud.nl:6443 (openshift)
Username: UserName
Password:
Login successful.

You don't have any projects. You can try to create a new project, by running

    oc new-project <projectname>

Welcome! See 'oc help' to get started.
If you have 2FA enabled on your account, you will first need to login tot the OpenShift webconsole. On the top-right corner, select your username and then select "Copy Login Command".
Now select "Display Token". Here you can copy the login command and paste in your terminal.
Introduction
In this lab you will learn to use openshift CLI to deploy an application.
Deploy using OC
Step 1: Add a new project from command line
Note: Please replace UserName with the username assigned to you in the commands below. Project names in OpenShift must be unique across the cluster. In order not to have an overlap between all the users, we are using YourName to enforce uniqueness in the name.
$ oc new-project workshop-mycliproject-YourName --description="My CLI Project" --display-name="CLI Project"
Note: If you get an error message The ProjectRequest "mycliproject-YourName" is invalid, it means you have not substituted your YourName!!
Upon project creation, OpenShift will automatically switch to the newly created project/namespace. If you wish to view the list of projects, run the following command:
$ oc get projects
If you have more than one project, you can switch to a different one by issuing oc project <project name>. Although you don’t want to do it now.
You can also check the status of the project by running the following command. It says that the project is currently not running anything.
$ oc status

In project CLI Project (workshop-mycliproject-YourName)

You have no services, deployment configs, or build configs.
Run 'oc new-app' to create an application.
Step 2: Create an application from a Docker Image
Next we will create an application inside the above project using an existing docker image. We will be using a very simple docker image on dockerhub.
First create a new application using the docker image using the
oc new-app command as shown below:
$ oc new-app redhatworkshops/welcome-php --name=welcome
--> Found container image 3e73433 (7 years old) from Docker Hub for "redhatworkshops/welcome-php"

    chx/welcome-php-1:b68a2d86
    --------------------------
    Platform for building and running PHP 5.6 applications

    Tags: builder, php, php56, rh-php56

    * An image stream tag will be created as "welcome:latest" that will track this image

--> Creating resources ...
    imagestream.image.openshift.io "welcome" created
    deployment.apps "welcome" created
    service "welcome" created
--> Success
    Application is not exposed. You can expose services to the outside world by executing one or more of the commands below:
     'oc expose svc/welcome'
    Run 'oc status' to view your app.
After running the command you can see the pod that was created by the build.
$ oc get pods

NAME               READY     STATUS    RESTARTS   AGE
welcome-1-dkyyq    0/1       Pending   0          0s
Step 3: Add a Route for your application
OpenShift also spins up a service for this application. Run the following command to view the list of services in the project (you can also use oc get svc shorthand).
$ oc get services

NAME      CLUSTER-IP     EXTERNAL-IP   PORT(S)    AGE
welcome   172.30.77.93   <none>        8080/TCP   2m
You will notice the welcome service was created for this project.
However, there is no route for this application yet. So you cannot access this application from outside.
Now add a route to the service with the following command. oc expose command will allow you to expose your service to the world so that you can access it from the browser.
$ oc expose service welcome --name=welcome
route.route.openshift.io/welcome exposed
Check the route created for your application now
$ oc get route
NAME      HOST/PORT                                               PATH   SERVICES   PORT       TERMINATION   WILDCARD
welcome   welcome-workshop-mycliproject-YourName.apps.first.40.ocpcloud.com          welcome    8080-tcp                 None
Note the URL listed under HOST/PORT.
Step 4: Try your application
Access the application: Now access the application using curl (looking for 200 status code) or from the browser and see the result
$ curl -Is <route>
Voila!! you created an application on OpenShift using an existing docker image on OpenShift.
Step 4: Clean up
Run the oc get all command to view all the components that were
created in your project.
$ oc get all
NAME                          READY   STATUS    RESTARTS   AGE
pod/welcome-85c8dc949-5q2r6   1/1     Running   0          110s

NAME              TYPE        CLUSTER-IP      EXTERNAL-IP   PORT(S)    AGE
service/welcome   ClusterIP   172.30.81.171   <none>        8080/TCP   112s

NAME                      READY   UP-TO-DATE   AVAILABLE   AGE
deployment.apps/welcome   1/1     1            1           112s

NAME                                 DESIRED   CURRENT   READY   AGE
replicaset.apps/welcome-54f9b49fc4   0         0         0       112s
replicaset.apps/welcome-85c8dc949    1         1         1       110s

NAME                                     IMAGE REPOSITORY                                                      TAGS     UPDATED
imagestream.image.openshift.io/welcome   openshift-image-registry.apps.cluster.chp5-test.npocloud.nl/hens-tim-test/welcome   latest   About a minute ago

NAME                               HOST/PORT                                    PATH   SERVICES   PORT       TERMINATION   WILDCARD
route.route.openshift.io/welcome   welcome-hens-tim-test.apps.cluster.chp5-test.npocloud.nl          welcome    8080-tcp                 None
Now you can delete all these components by running one command.
$ oc delete all --all
pod "welcome-86777fcbb5-mjrvr" deleted
service "welcome" deleted
deployment.apps "welcome" deleted
Warning: apps.openshift.io/v1 DeploymentConfig is deprecated in v4.14+, unavailable in v4.10000+
imagestream.image.openshift.io "welcome" deleted
route.route.openshift.io "welcome" deleted
You will notice that it has deleted the imagestream for the application, the deploymentconfig, the service and the route.
You can run oc get all again to make sure the project is empty.
You can now delete the project by running. Substitute your YourName in the command below.
oc delete project workshop-mycliproject-YourNameCongratulations!! You now know how to create a project, an application using an external docker image and navigate around. Get ready for more fun stuff!
Deploy a Multi-Tiered App
Deploy Multi-tiered Application
Introduction
In this lab we will learn to deploy a multi-tiered application on OpenShift. This will be a typical three tier application with database, backend component and a frontend component.
Deploy a Database
Create a new project
| Substitute YourName with your name below |
oc new-project workshop-multitiered-YourName
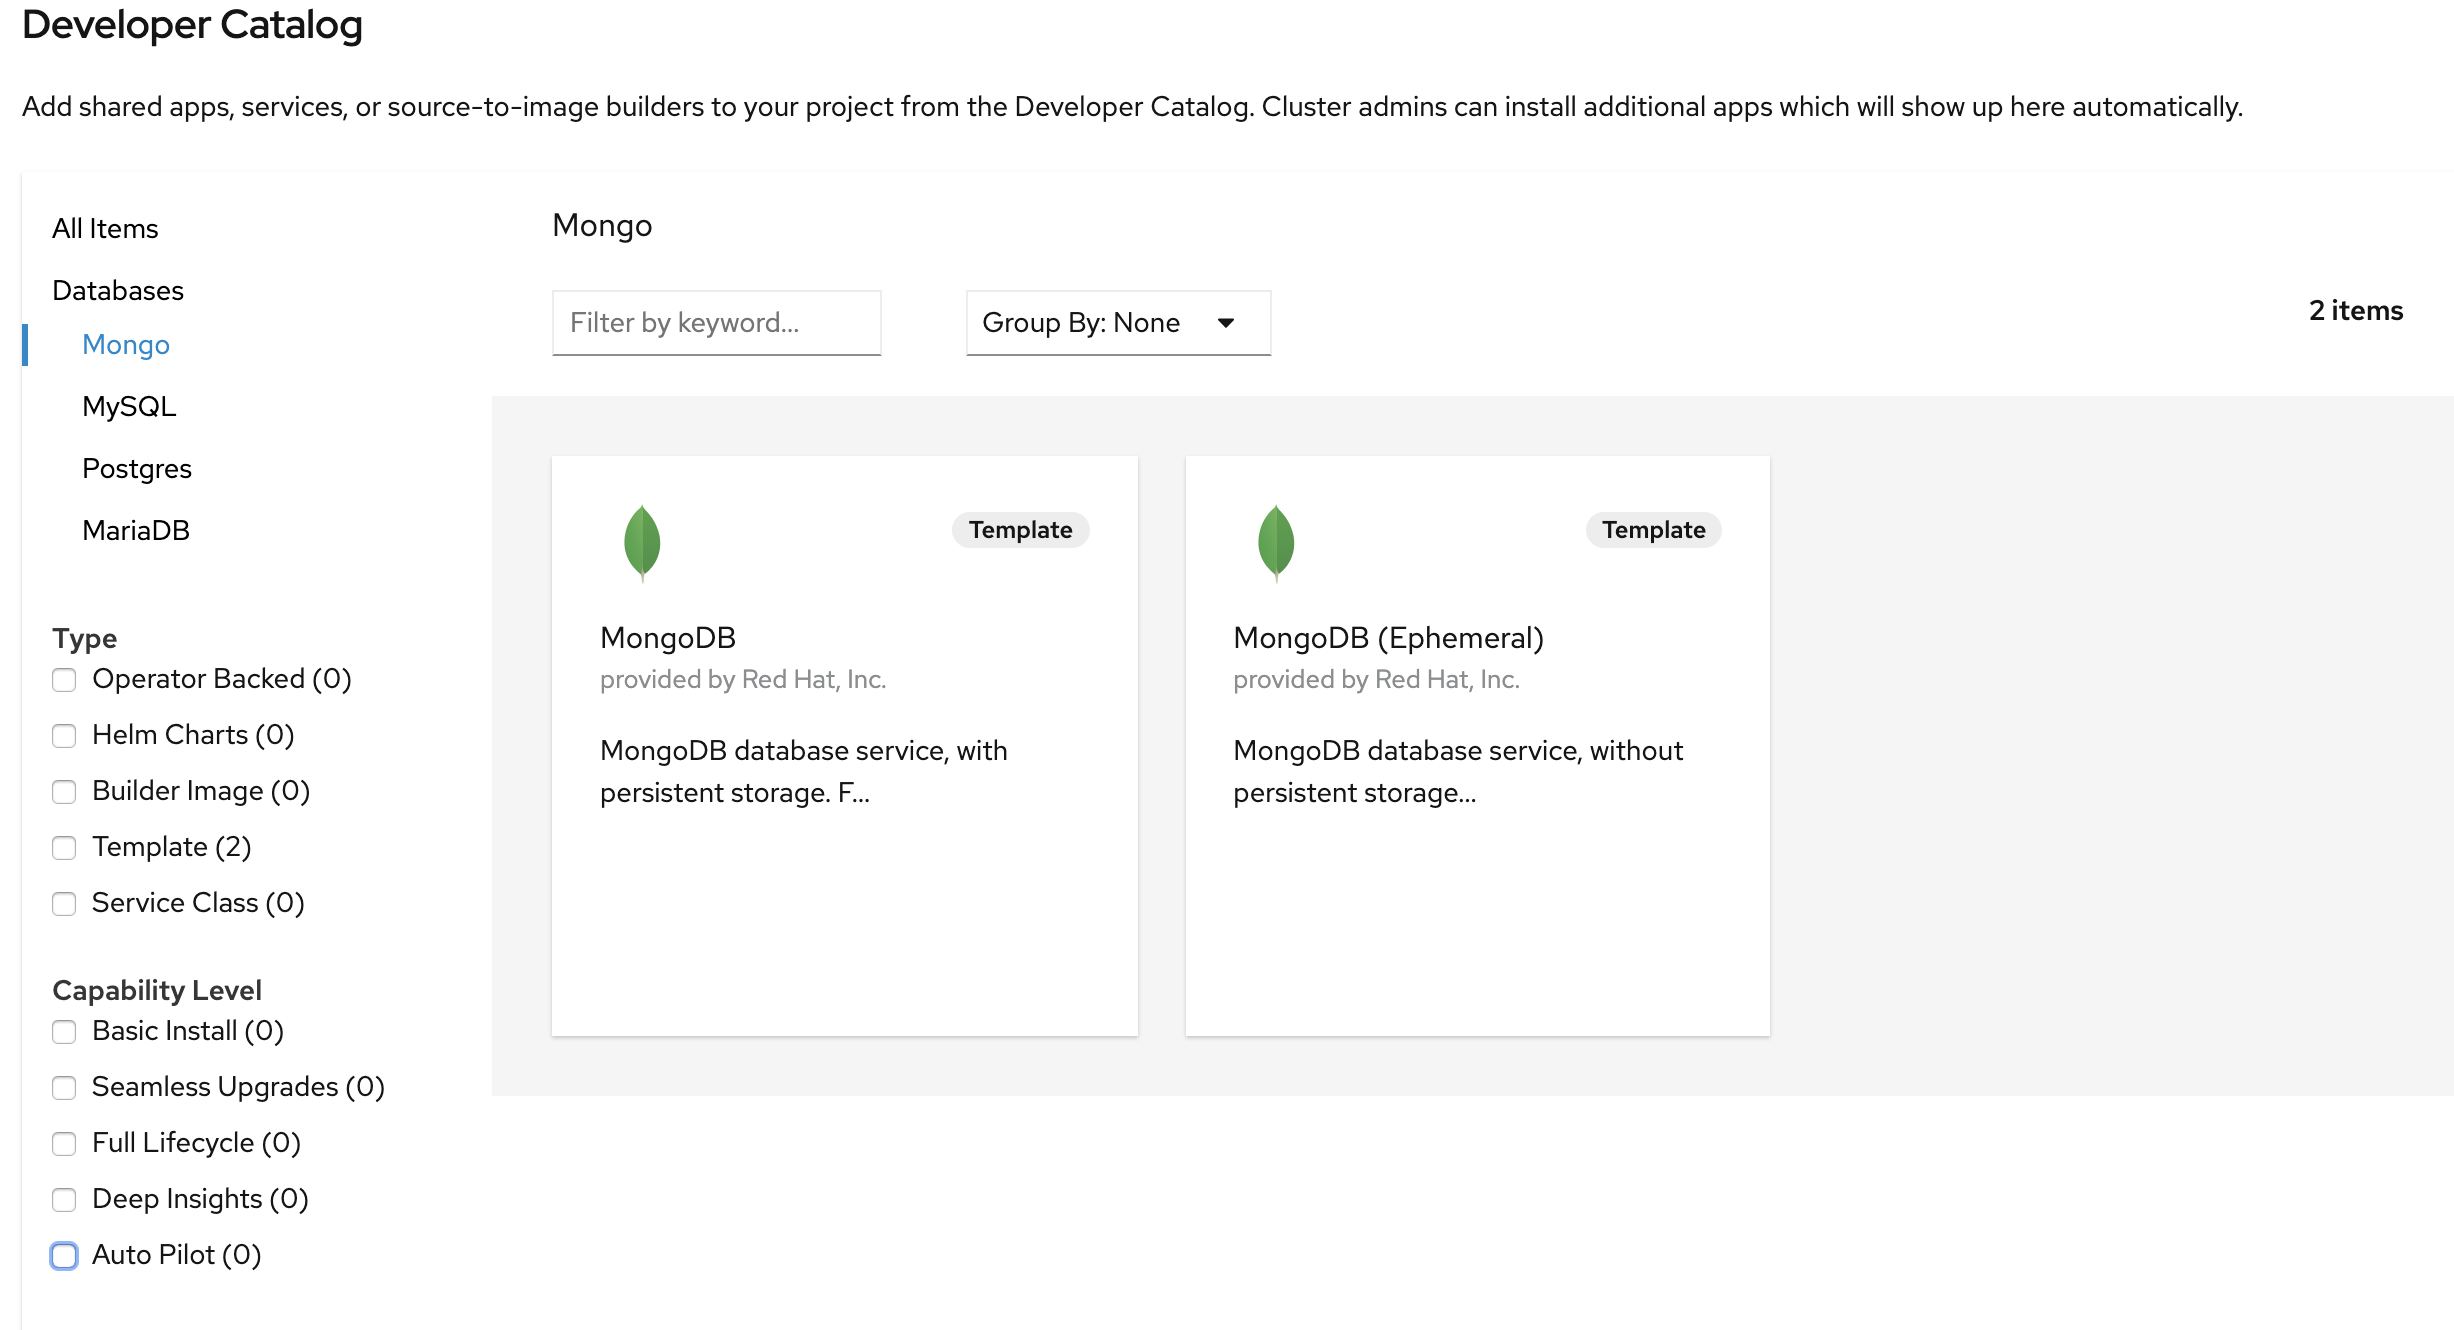
We will use MongoDB. You can deploy MongoDB using command line as follows:
oc new-app mongodb-ephemeral \
-l app.openshift.io/runtime=mongodb,\
app.kubernetes.io/part-of=multi-tiered-app
-
app.openshift.io/runtime=mongodbis a label to display runtime icon on webconsole -
app.kubernetes.io/part-of=multi-tiered-appdisplays the deployment as part of an application grouping calledmulti-tiered-appon web console
Or you can also use WebConsole and select Mongodb Ephemeral from the developer catalog
This will deploy the database and also create a secret that has credentials to connect to the database. Note the name of that secret as we will be using that with our backend application to connect to the database.
..
..
..
--> Creating resources with label app.kubernetes.io/part-of=multi-tiered-app,app.openshift.io/runtime=mongodb ...
    secret "mongodb" created (1)
    service "mongodb" created (2)
    deploymentconfig.apps.openshift.io "mongodb" created (3)
--> Success
    Application is not exposed. You can expose services to the outside world by executing one or more of the commands below:
     'oc expose svc/mongodb'
    Run 'oc status' to view your app.
| 1 | this is the database secret that we will inject into our backend app later |
| 2 | this is the database service |
| 3 | this is the deploymentconfig |
Once deployed, you have the first tier of the 3-tier app deployed that shows up on the web console as

Deploy Backend Application
Now we will deploy the backend application by running the following commands. The first command deploys the application and the second one applies an annotation to visually show connection to the database on the web console.
| You can deploy this from web console by browsing through the the catalog and supplying the source code URL as input and selecting the runtime. |
oc new-app https://github.com/RedHatWorkshops/openshiftv4-odo-workshop-backend.git \
--name=kiosk-backend \
-l app.openshift.io/runtime=nodejs,\
app.kubernetes.io/part-of=multi-tiered-app

oc annotate deployment/kiosk-backend app.openshift.io/connects-to=mongodb
-
app.openshift.io/runtime=nodejsis a runtime label to display icon on web console -
app.kubernetes.io/part-of=multi-tiered-appis a label to make app part-of application group -
app.openshift.io/connects-to=mongodbis an annotation to display connectivity between backend and database
This will start openshift S2I build for your backend application. The build will run for a few mins.
..
..
--> Creating resources with label app.kubernetes.io/part-of=multi-tiered-app,app.openshift.io/runtime=nodejs ...
    imagestream.image.openshift.io "kiosk-backend" created
    buildconfig.build.openshift.io "kiosk-backend" created
    deployment.apps "kiosk-backend" created
    service "kiosk-backend" created
--> Success
    Build scheduled, use 'oc logs -f bc/kiosk-backend' to track its progress.
    Application is not exposed. You can expose services to the outside world by executing one or more of the commands below:
     'oc expose svc/kiosk-backend'
    Run 'oc status' to view your app.
Once deployed, you will need to patch the resource limits for the Build:
## Select the project
$ oc project <Your Project>

## Now we need to find the builds
$ oc get builds

NAME              TYPE     FROM   STATUS    STARTED         DURATION
kiosk-backend-1   Source   Git    Running   5 seconds ago

## If the build is still running, cancel it first:
$ oc cancel-build kiosk-backend

## Afterwards, we need to patch the BuildConfig, which is the name of the build without the "-1"
$ oc patch bc/kiosk-backend --patch '{"spec":{"resources":{"limits":{"memory":"1Gi","cpu":"1000m"}}}}'

## Now, start a new build
$ oc start-build kiosk-backend

## You can check it's status again by running oc get builds
$ oc get builds
NAME              TYPE     FROM          STATUS                       STARTED          DURATION
kiosk-backend-1   Source   Git@c08f65c   Cancelled (CancelledBuild)   49 seconds ago   18s
kiosk-backend-2   Source   Git@c08f65c   Running                      4 seconds ago
You can watch build logs either using web console or via command line oc logs build/kiosk-backend-2
In the meanwhile, we will patch the deployment configuration to add environment variables that reference the database secret. This is required for your backend application to make a service connection to the database.
oc patch deployment/kiosk-backend --type='json' -p='[{"op": "add", "path": "/spec/template/spec/containers/0/env", "value": [ { "name": "username", "valueFrom": { "secretKeyRef": { "name": "mongodb", "key": "database-user" } } },{ "name": "password", "valueFrom": { "secretKeyRef": { "name": "mongodb", "key": "database-password" } } },{ "name": "database_name", "valueFrom": { "secretKeyRef": { "name": "mongodb", "key": "database-name" } } },{ "name": "admin_password", "valueFrom": { "secretKeyRef": { "name": "mongodb", "key": "database-admin-password" } } } ] }]'
Applying this patch will add the following to the deployment configuration. You can check the deployment configuration by running oc get dc/kiosk-backend -o yaml.
    spec:
      containers:
      - env:
        - name: username
          valueFrom:
            secretKeyRef:
              key: database-user
              name: mongodb
        - name: password
          valueFrom:
            secretKeyRef:
              key: database-password
              name: mongodb
        - name: database_name
          valueFrom:
            secretKeyRef:
              key: database-name
              name: mongodb
        - name: admin_password
          valueFrom:
            secretKeyRef:
              key: database-admin-password
              name: mongodb
This configuration creates the secret mappings and assigns respective values from the secrets to the environment variables when the container starts running.
| env variable | key from secret |
|---|---|
username |
database-user |
password |
database-password |
database_name |
database-name |
admin_password |
database-admin-password |
Once deployed, you have the 1st and 2nd tiers of the 3-tier app deployed that shows up on the web console as

Deploy Frontend
Let us now deploy the frontend component. While creating the frontend we will also link this to the backend component that we deployed in the last step by passing the environment variables that point to the backend service.
| You can deploy this from web console by browsing through the the catalog and supplying the source code URL as input and selecting the runtime. |
# Get the backend hostname (NAME) and port (PORT(S)):
oc get service kiosk-backend

NAME            TYPE        CLUSTER-IP     EXTERNAL-IP   PORT(S)    AGE
kiosk-backend   ClusterIP   172.30.47.49   <none>        8080/TCP   8m9s

BACKEND_NAME=kiosk-backend
BACKEND_PORT=8080

oc new-app https://github.com/RedHatWorkshops/openshiftv4-odo-workshop.git \
--name=kiosk-frontend \
-l app.openshift.io/runtime=nodejs,\
app.kubernetes.io/part-of=multi-tiered-app \
-e COMPONENT_BACKEND_HOST=$BACKEND_NAME \
-e COMPONENT_BACKEND_PORT=$BACKEND_PORT

oc annotate deployment/kiosk-frontend app.openshift.io/connects-to=kiosk-backend
-
COMPONENT_BACKEND_HOSTis an env variable that points to backend service -
COMPONENT_BACKEND_PORTis an env variable that points to backend service port -
app.openshift.io/connects-to=kiosk-backendis an annotation to show connection from frontend component to backend on the web console
oc get svc kiosk-backend --template= provides service name and
oc get svc kiosk-backend -o=jsonpath='{ .spec.ports[?(@.name == "8080-tcp")].targetPort }' gives you the service port. You can find these values by running oc get svc kiosk-backend directly and substitute those values. The above line shows how you can script it all into one line.
|
Once deployed, we need to patch the resource limits for the build:
## Select the project
$ oc project <Your Project>

## Now we need to find the builds
$ oc get builds

NAME               TYPE     FROM          STATUS                       STARTED         DURATION
kiosk-backend-1    Source   Git@c08f65c   Cancelled (CancelledBuild)   5 minutes ago   18s
kiosk-backend-2    Source   Git@c08f65c   Complete                     4 minutes ago   1m0s
kiosk-frontend-1   Source   Git           Running

## If the build is still running, cancel it first:
$ oc cancel-build kiosk-frontend

## Afterwards, we need to patch the BuildConfig, which is the name of the build without the "-1"
$ oc patch bc/kiosk-frontend --patch '{"spec":{"resources":{"limits":{"memory":"1Gi","cpu":"1000m"}}}}'

## Now, start a new build
$ oc start-build kiosk-frontend

## You can check it's status again by running oc get builds
$ oc get builds
NAME               TYPE     FROM          STATUS                       STARTED          DURATION
kiosk-backend-1    Source   Git@c08f65c   Cancelled (CancelledBuild)   5 minutes ago    18s
kiosk-backend-2    Source   Git@c08f65c   Complete                     5 minutes ago    1m0s
kiosk-frontend-1   Source   Git@caf228f   Cancelled (CancelledBuild)   42 seconds ago   14s
kiosk-frontend-2   Source   Git@caf228f   Running                      8 seconds ago
Create a route to expose your frontend component via openshift router.
oc expose svc kiosk-frontend
| We did not expose our backend application to create an openshift route. This is because it would be accessed only within the openshift cluster. So, you would only want to expose those services that need to be accessed from outside the cluster. |
Once done, you have all 3 tiers of your app deployed that shows up on the web console as

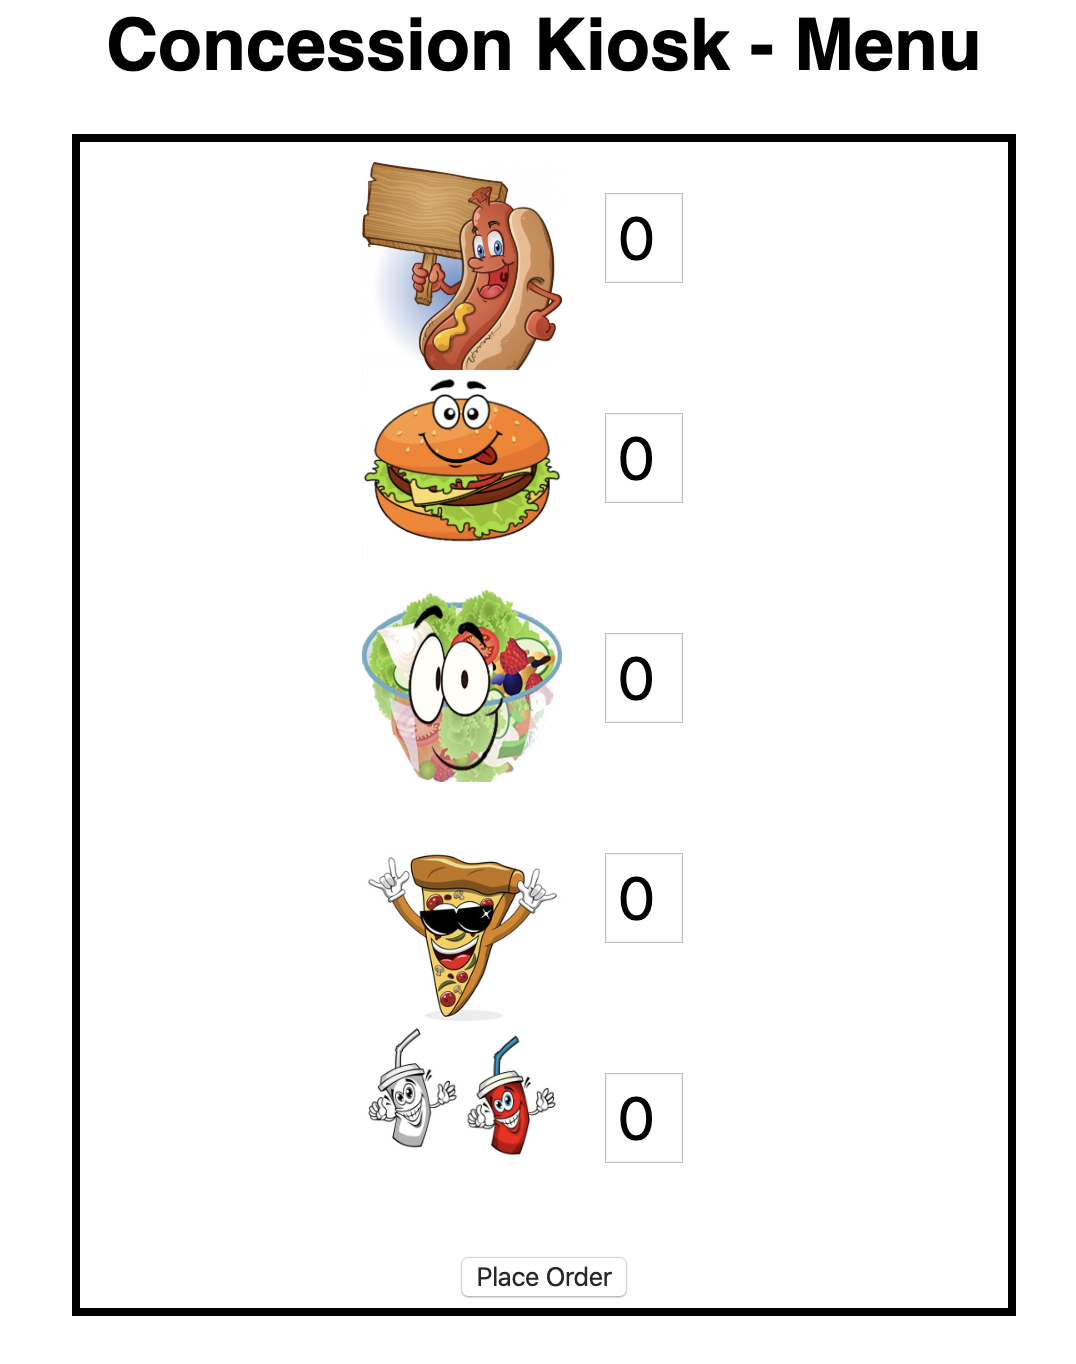
Test App
Now test the application by accessing its URL. You can get the URL by running
oc get route kiosk-frontend
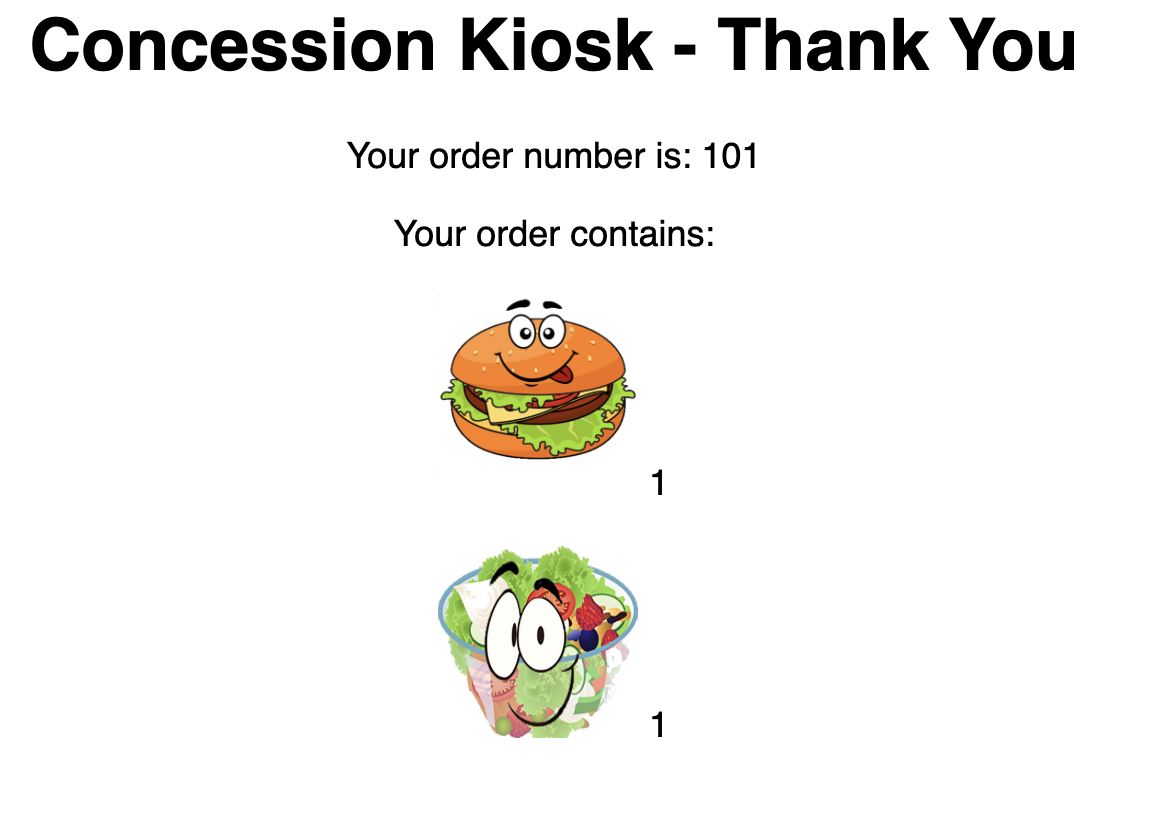
Test in the browser, you will see this screen.Place and order and confirm that you are getting an order number with order details:
Clean up
Run these commands to clean up your multi-tiered application.
-
Delete frontend component:
oc delete all -l app=kiosk-frontend
-
Delete backend component
oc delete all -l app=kiosk-backend
-
Delete database component
oc delete all -l app=mongodb-ephemeral
-
Delete database secret
oc delete secret mongodb
-
Delete project/namespace
| Substitute UserName before running the command |
oc delete project workshop-multitiered-YourName
Application Scaling
Introduction
In this exercise we will learn how to scale our application. OpenShift has the capability to scale your application based on the workload.
First we will deploy an application, scale it up and down manually. We will also learn Idling which is a unique concept in OpenShift.
Then we will learn to setup horizontal pod autocaler that automatically scales your application based on the workload and scales down when the workload reduces.
Deploy an Application to Scale
Create a new Project
oc new-project workshop-scale-up-down-YourNameReplace YourName with your name before creating the project.
Deploy an application*
We will deploy a simple PHP application that has index.php which does some computation. You can deploy using web console or CLI. Steps below show the deployment using CLI by running oc new-app --image-stream=php --code=https://github.com/RedHatWorkshops/hpademo as shown below
oc new-app --image-stream=php --code=https://github.com/RedHatWorkshops/hpademo
--> Found image 275ad31 (2 months old) in image stream "openshift/php" under tag "8.0-ubi8" for "php"

    Apache 2.4 with PHP 8.0
    -----------------------
    PHP 8.0 available as container is a base platform for building and running various PHP 8.0 applications and frameworks. PHP is an HTML-embedded scripting language. PHP attempts to make it easy for developers to write dynamically generated web pages. PHP also offers built-in database integration for several commercial and non-commercial database management systems, so writing a database-enabled webpage with PHP is fairly simple. The most common use of PHP coding is probably as a replacement for CGI scripts.

    Tags: builder, php, php80, php-80

    * The source repository appears to match: php
    * A source build using source code from https://github.com/RedHatWorkshops/hpademo will be created
      * The resulting image will be pushed to image stream tag "hpademo:latest"
      * Use 'oc start-build' to trigger a new build

--> Creating resources ...
    imagestream.image.openshift.io "hpademo" created
    buildconfig.build.openshift.io "hpademo" created
    deployment.apps "hpademo" created
    service "hpademo" created
--> Success
    Build scheduled, use 'oc logs -f buildconfig/hpademo' to track its progress.
    Application is not exposed. You can expose services to the outside world by executing one or more of the commands below:
     'oc expose service/hpademo'
    Run 'oc status' to view your app.
Create a route by exposing the service
$ oc expose svc hpademo
route.route.openshift.io/hpademo exposed
Run oc get route to get the URL for your application. Eventually your application gets built and deployed.
$ oc get route
NAME      HOST/PORT                                                                   PATH   SERVICES   PORT       TERMINATION   WILDCARD
hpademo   hpademo-workshop-scale-up-down-maurice.apps.cluster.chp5-test.npocloud.nl          hpademo    8080-tcp                 None
If you curl the URL you will see that the index.php page does some computation and displays OK!
curl hpademo-$yourProject.apps.chp5-test.npocloud.nl
OK!
Scaling
Understanding Replicas Setting in Deployment Configuration vs Replication Controller
Check the deployment configuration for this application by running oc get deployment/hpademo -o yaml and focus on spec
...
spec:
  ...
  replicas: 1
  ...
...
You’ll notice that the replicas: is set to 1. This tells OpenShift that when this application deploys, make sure that there is 1 instance running.
Manual Scaling
To scale your application we will edit the deployment to 3.
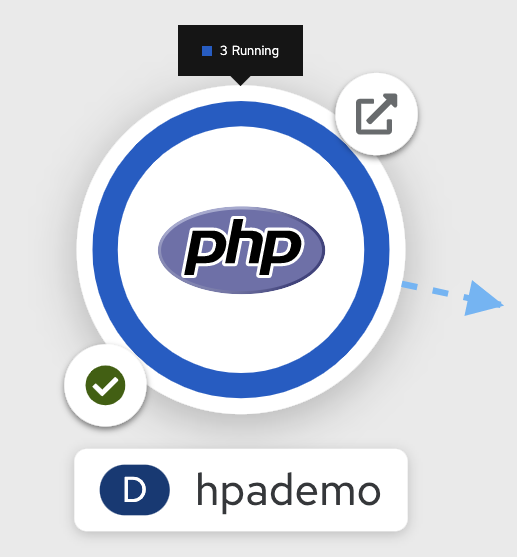
Open your browser to the Topology page and note you only have one instance running. It shows when you hover over the deployment.

Now scale your application using the oc scale command (remembering to specify the dc)
$ oc scale --replicas=3 deployment/hpademo
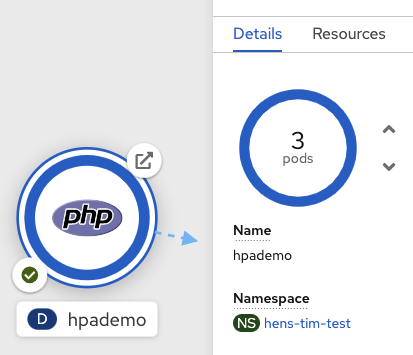
deployment.apps/hpademo scaledIf you look at the web console and you will see that there are 3 instances running now
Note: You can also scale up and down from the web console by navigating to overview page and clicking twice on up arrow right next to the pod count circle to change replica count.
On the command line, see how many pods you are running now:
$ oc get pods
NAME               READY   STATUS      RESTARTS   AGE
AME                       READY   STATUS      RESTARTS   AGE
hpademo-1-build            0/1     Completed   0          43m
hpademo-684cd45d56-4f2xj   1/1     Running     0          42m
hpademo-684cd45d56-92sh6   1/1     Running     0          76s
hpademo-684cd45d56-pfhfw   1/1     Running     0          76s
You now have 3 instances of hpademo-1 running (each with a different pod-id).
Idling
A related concept is application idling. OpenShift allows you to conserve resources by sleeping the application when not in use. When you try to use the application it will spin up the container automagically.
Idling the application
Run the following command to find the available endpoints
$ oc get endpoints
NAME      ENDPOINTS                                                        AGE
hpademo   10.128.2.37:8443,10.129.2.29:8443,10.130.2.28:8443 + 3 more...   37m
Note that the name of the endpoints is hpademo and there are three ip addresses for the three pods.
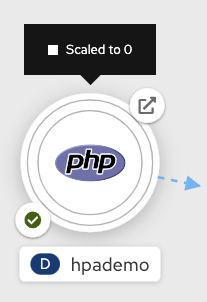
Run the oc idle endpoints/hpademo command to idle the application
$ oc idle endpoints/hpademo
The service "scaling-user1/hpademo" has been marked as idled
The service will unidle Deployment "scaling-user1/hpademo" to 3 replicas once it receives traffic
Deployment "scaling-user1/hpademo" has been idled
Go back to the web console. You will notice that the pods show up as idled.
At this point the application is idled, the pods are not running and no resources are being used by the application. This doesn’t mean that the application is deleted. The current state is just saved.. that’s all.
Reactivate your application
Now click on the application route URL or access the application via curl.
Note that it takes a little while for the application to respond. This is because pods are spinning up again. You can notice that in the web console.
In a little while the output comes up and your application would be up with 3 pods (based on your replica count).
So, as soon as the user accesses the application, it comes up!!!
Scaling Down
Scaling down is the same procedure as scaling up. Use the oc scale
command on the hpademo application deployment setting.
$ oc scale --replicas=1 deployment/hpademo

deployment.apps/hpademo scaled
Alternately, you can go to project overview page and click on down arrow twice to remove 2 running pods.
Auto Scaling
Horizontal Pod AutoScaler (HPA) allows you to automatically scale your application based on the workload. It updates replicacount by watching the workload.
Set Resource Limits on your application
HPA requires your pods to have requests and limits set so that it knows when to scale the application based on the consumption of resources.
Let us update the deployment to set the resources by running oc set resources
$ oc set resources deployment hpademo --requests=cpu=200m --limits=cpu=500m
deployment.apps/hpademo resource requirements updated
We have set the CPU request (initial allocation) as 200 millicores and limit (maximum allocation) to 500 millicores. So when we ask HPA to scale based on percentage workload, it measures based on these numbers.
Set up HPA
Now we will create HPA by running oc autoscale command
$ oc autoscale deployment hpademo --cpu-percent=50 --min=1 --max=10
horizontalpodautoscaler.autoscaling/hpademo autoscaled
Here we are did two things:
-
cpu-percent=50indicates that when the CPU usage (based on requests and limits) reaches 50%, HPA should spin up additional pods -
--min=1 --max=10sets upper and lower limits for the number of pods. We want to run minimum 1 pod and maximum it can scale up to 10 pods. Why? We cannot allow our application to consume all resources on the cluster.. right?
Generate Load
Now it is time to generate load and test
Open a local terminal and run apache benchmark or another load generator.
$ ab -n 1000 -c 100 http://hpademo-workshop-scale-up-down-maurice.apps.cluster.chp5-test.npocloud.nl/Watch Scaling
In the other terminal, run oc get hpa hpademo -w to watch how the load goes up. After a little while once the application scale up to a few pods, stop the load by pressing ^C. And you can watch the application scaling down.
You can also see the number of pods go up on webconsole
NOTE Scale up takes a few mins and so does Scale down. So be patient.
$ oc get hpa -w
NAME      REFERENCE            TARGETS         MINPODS   MAXPODS   REPLICAS   AGE
hpademo   Deployment/hpademo   <unknown>/50%   1         10        1          72s
hpademo   Deployment/hpademo   0%/50%          1         10        1          75s
hpademo   Deployment/hpademo   13%/50%         1         10        1          90s
hpademo   Deployment/hpademo   36%/50%         1         10        1          2m15s
hpademo   Deployment/hpademo   69%/50%         1         10        1          2m30s
hpademo   Deployment/hpademo   68%/50%         1         10        2          2m45s
hpademo   Deployment/hpademo   95%/50%         1         10        2          3m
hpademo   Deployment/hpademo   94%/50%         1         10        2          3m15s
hpademo   Deployment/hpademo   117%/50%        1         10        2          3m31s
hpademo   Deployment/hpademo   124%/50%        1         10        3          3m46s
hpademo   Deployment/hpademo   137%/50%        1         10        3          4m1s
hpademo   Deployment/hpademo   145%/50%        1         10        3          4m16s
hpademo   Deployment/hpademo   150%/50%        1         10        3          4m31s
hpademo   Deployment/hpademo   143%/50%        1         10        3          4m46s
hpademo   Deployment/hpademo   144%/50%        1         10        3          5m1s
hpademo   Deployment/hpademo   143%/50%        1         10        3          5m16s
hpademo   Deployment/hpademo   143%/50%        1         10        3          5m31s
hpademo   Deployment/hpademo   149%/50%        1         10        3          5m46s
hpademo   Deployment/hpademo   132%/50%        1         10        3          6m1s
hpademo   Deployment/hpademo   120%/50%        1         10        3          6m16s
hpademo   Deployment/hpademo   107%/50%        1         10        3          6m31s
hpademo   Deployment/hpademo   87%/50%         1         10        3          6m47s
hpademo   Deployment/hpademo   82%/50%         1         10        3          7m2s
hpademo   Deployment/hpademo   53%/50%         1         10        3          7m17s
hpademo   Deployment/hpademo   51%/50%         1         10        3          7m32s
hpademo   Deployment/hpademo   29%/50%         1         10        3          7m47s
hpademo   Deployment/hpademo   27%/50%         1         10        3          8m2s
hpademo   Deployment/hpademo   10%/50%         1         10        3          8m17s
hpademo   Deployment/hpademo   2%/50%          1         10        3          8m32s
hpademo   Deployment/hpademo   1%/50%          1         10        3          8m47s
hpademo   Deployment/hpademo   0%/50%          1         10        3          9m2s
hpademo   Deployment/hpademo   0%/50%          1         10        3          12m
hpademo   Deployment/hpademo   0%/50%          1         10        2          12m
hpademo   Deployment/hpademo   0%/50%          1         10        2          13m
hpademo   Deployment/hpademo   0%/50%          1         10        1          13m
Clean up
Once you are done with your testing run
oc delete all --all to clean up all the artifacts and oc delete project workshop-scale-up-down-YourName to delete the project
Summary
In this lab we have learnt to manually scale up and scale down, and idle the application. We have also learnt to use horizontal pod autoscaler to autoscale the application based on the workload.
Deploy Binary Artifacts
Introduction
Java developers are used to creating binary artifacts such as war file using continuous integration process and test the binary on their workstation.
OpenShift SourceToImage (S2I) process includes an assemble script that copies the source code from a git repository, invokes a maven build, places the resultant war file in the deployments folder, builds a new application image and pushes that image into the registry.
While OpenShift S2I can take your source code and build it into a container, there is also an approach to use a binary (such as a war file) created on your workstation to be used as input instead of source code. This lab explains how to using a binary as input to create and deploy an application on OpenShift.
In this exercise you will learn to deploy a war file. We will assume that you built your source code outside of OpenShift build process and want to download the WAR file on your workstation.
Deploying a war file
Step 1: Create project & folder structure
oc new-project workshop-binarydeploy-YourName
mkdir binarytest && cd binarytest
mkdir deploymentsNote: You can also create a modules directory at the same level as deployments above and have additional modules there or configuration files. As an example:
mkdir modules
cd modules
mkdir cfg
cd cfg
touch config-1.cfg config-2.cfg
Step 2: Create/Copy a war file
Create a war file and place it in deployments directory.
We have provided a warfile for a simple petstore application here. If you want to use this war file
$ cd /binarytest/deployments/

$ wget https://raw.githubusercontent.com/RedHatWorkshops/ps/master/deployments/ROOT.war

$ cd ..
Note that the war file needs to be in the deployments folder. You can verify running ls -lR as shown below.
$ ls -lR
.:
total 0
drwxr-xr-x. 2 default root 22 Jul 16 13:10 deployments
drwxr-xr-x. 3 default root 17 Jul 16 13:10 modules

./deployments:
total 6012
-rw-r--r--. 1 default root 6155452 Jul 16 13:10 ROOT.war

./modules:
total 0
drwxr-xr-x. 2 default root 46 Jul 16 13:09 cfg

./modules/cfg:
total 0
-rw-r--r--. 1 default root 0 Jul 16 13:06 config-1.cfg
-rw-r--r--. 1 default root 0 Jul 16 13:06 config-2.cfg
Step 3: Using builder image
Create a new build using the builder image of your choice. Here we are using JBoss EWS (tomcat 8) image. The flag binary=true indicates that this build will use the binary content instead of the url to the source code.
Here I am naming my application as myapp. So all the artifacts will get the name myapp.
$ oc new-build --image-stream=jboss-webserver30-tomcat8-openshift:1.3 --binary=true --name=myapp
--> Found image decb6b8 (2 years old) in image stream "openshift/jboss-webserver30-tomcat8-openshift" under tag "1.3" for "jboss-webserver30-tomcat8-openshift:1.3"

    JBoss Web Server 3.0
    --------------------
    Platform for building and running web applications on JBoss Web Server 3.0 - Tomcat v8

    Tags: builder, java, tomcat8

    * A source build using binary input will be created
      * The resulting image will be pushed to image stream tag "myapp:latest"
      * A binary build was created, use 'oc start-build --from-dir' to trigger a new build

--> Creating resources with label build=myapp ...
    imagestream.image.openshift.io "myapp" created
    buildconfig.build.openshift.io "myapp" created
--> Success
Step 4: Patch build configuration
The build config needs some more resources:
oc patch bc/myapp --patch '{"spec":{"resources":{"limits":{"memory":"1Gi","cpu":"1000m"}}}}'
Step 5: Executing the build
Start the build by uploading the contents of your deployments directory. Make sure you are in the parent folder where you created the deployments folder inside previously. Remember the war file is in the deployments folder. The jboss-ews builder image knows to copy the contents of the deployments folder to the deployments directory and then builds the application image.
$ oc start-build myapp --from-dir=.

Uploading directory "." as binary input for the build ...
build "myapp-1" started
You can check the build logs by executing:
$ oc logs myapp-1-build -f
Caching blobs under "/var/cache/blobs".
Getting image source signatures
Copying blob sha256:5d448162298455ec38635223e668573d6f0c1a5f4b46ae5dd54e1e0b30de83ab
Copying blob sha256:26e5ed6899dbf4b1e93e0898255e8aaf43465cecd3a24910f26edb5d43dafa3c
Copying blob sha256:f591071b502f5c9eda5bff0f5d5adff911075d3be7081c86aa3b3690879ccb20
Copying blob sha256:66dbe984a319ca6d40dc10c2c561821128a0bd8967e0cbd8cc2a302736041ffb
Copying blob sha256:39fe8b1d3a9cb13a361204c23cf4e342d53184b4440492fa724f4aeb4eb1d64f
Copying blob sha256:78f9ea175a0a36eeccd5399d82c03146149c4d6ad6afa134cb314c7d3be7dab9
Writing manifest to image destination
Storing signatures
Generating dockerfile with builder image image-registry.openshift-image-registry.svc:5000/openshift/jboss-webserver30-tomcat8-openshift@sha256:0089883f8e4387618946
cd24378a447b8cf7e5dfaa146b94acab27fc5e170a14
STEP 1: FROM image-registry.openshift-image-registry.svc:5000/openshift/jboss-webserver30-tomcat8-openshift@sha256:0089883f8e4387618946cd24378a447b8cf7e5dfaa146b94
acab27fc5e170a14
STEP 2: LABEL "io.openshift.build.image"="image-registry.openshift-image-registry.svc:5000/openshift/jboss-webserver30-tomcat8-openshift@sha256:0089883f8e438761894
6cd24378a447b8cf7e5dfaa146b94acab27fc5e170a14" "io.openshift.build.source-location"="/tmp/build/inputs"
STEP 3: ENV OPENSHIFT_BUILD_NAME="myapp-1" OPENSHIFT_BUILD_NAMESPACE="binarydeploy-user1"
STEP 4: USER root
STEP 5: COPY upload/src /tmp/src
STEP 6: RUN chown -R 185:0 /tmp/src
STEP 7: USER 185
STEP 8: RUN /usr/local/s2i/assemble
Copying all war artifacts from /tmp/src directory into /opt/webserver/webapps for later deployment...
Copying all war artifacts from /tmp/src/deployments directory into /opt/webserver/webapps for later deployment...
'/tmp/src/deployments/ROOT.war' -> '/opt/webserver/webapps/ROOT.war'
STEP 9: CMD /usr/local/s2i/run
STEP 10: COMMIT temp.builder.openshift.io/binarydeploy-user1/myapp-1:68fa1706
Getting image source signatures
Copying blob sha256:c1eac31e742f9787152adeb8d82dbff43882214993210f684a432ec5b8f276ec
Copying blob sha256:9161a60cc9644083de5cafc67d0efe1d03aeabe6159f1df397dcccf2a049e533
Copying blob sha256:c1647cf3b72a31c070f609575aac699971d365480f7aff2bb9a983faf512e2fb
Copying blob sha256:cbff328cfc7cd882d24817de0afa16c033c13f41e9b8aa9a5d7d68d2276c1e54
Copying blob sha256:230d57d119424eb993e0c53e3295b76a74f03f8f15509e02535e18e4558915c3
Copying blob sha256:53497b8e19d78afc18b7005d647e127af730723b14cd1d24ed1dab0605cf123a
Copying blob sha256:97051fa237bede794309b0e90877f1b39952423ba9b987f2fd9377bdb1b99c00
Copying config sha256:459efe1ae6900107c4210b270c9fe60ed7011e02eed71823b6c20ccac0ebb7c7
Writing manifest to image destination
Storing signatures
459efe1ae6900107c4210b270c9fe60ed7011e02eed71823b6c20ccac0ebb7c7
459efe1ae6900107c4210b270c9fe60ed7011e02eed71823b6c20ccac0ebb7c7

Pushing image image-registry.openshift-image-registry.svc:5000/binarydeploy-user1/myapp:latest ...
Getting image source signatures
Copying blob sha256:78f9ea175a0a36eeccd5399d82c03146149c4d6ad6afa134cb314c7d3be7dab9
Copying blob sha256:5d448162298455ec38635223e668573d6f0c1a5f4b46ae5dd54e1e0b30de83ab
Copying blob sha256:97051fa237bede794309b0e90877f1b39952423ba9b987f2fd9377bdb1b99c00
Copying blob sha256:26e5ed6899dbf4b1e93e0898255e8aaf43465cecd3a24910f26edb5d43dafa3c
Copying blob sha256:f591071b502f5c9eda5bff0f5d5adff911075d3be7081c86aa3b3690879ccb20
Copying blob sha256:66dbe984a319ca6d40dc10c2c561821128a0bd8967e0cbd8cc2a302736041ffb
Copying blob sha256:39fe8b1d3a9cb13a361204c23cf4e342d53184b4440492fa724f4aeb4eb1d64f
Copying config sha256:459efe1ae6900107c4210b270c9fe60ed7011e02eed71823b6c20ccac0ebb7c7
Writing manifest to image destination
Storing signatures
Successfully pushed image-registry.openshift-image-registry.svc:5000/binarydeploy-user1/myapp@sha256:0c4ebbc42fd9d2f9ed275df841ddc563cf13840f6df668de6892de22a12f7c
a5
Push successful
NOTE that the above build executes S2I by copying war file from your workstation to the build pod.
Step 6: Create the application
Now create the application with the same name as what you gave for the build.
Here we are using the name myapp, so that the rest of the objects such as deployment configuration and service are created with the same name and refer to the image-stream created earlier.
$ oc new-app myapp --allow-missing-imagestream-tags -l app.openshift.io/runtime=rh-tomcat
--> Found image 4291312 (About a minute old) in image stream "hens-tim-test/myapp" under tag "latest" for "myapp"

    JBoss Web Server 3.0
    --------------------
    Platform for building and running web applications on JBoss Web Server 3.0 - Tomcat v8

    Tags: builder, java, tomcat8


--> Creating resources with label app.openshift.io/runtime=rh-tomcat ...
    deployment.apps "myapp" created
    service "myapp" created
--> Success
    Application is not exposed. You can expose services to the outside world by executing one or more of the commands below:
     'oc expose svc/myapp'
    Run 'oc status' to view your app.

# Don't forget the resources
$ oc set resources deploymentconfig myapp --limits=cpu=1000m,memory=1024Mi
Now, expose the service as a route to be able to use it from the browser.
$ oc expose svc myapp
route.route.openshift.io/myapp exposed
You can use the route to access the application using the URL.
$ oc get routeDelete project
oc delete project workshop-binarydeploy-YourNameUsing ConfigMaps
Prerequisites
-
You have access to OpenShift Web Console URL. Ask your workshop coordinator for URL if you don’t have one.
-
You have credentials to login. Ask your workshop coordinator for credentials to log onto the OpenShift cluster
-
Git must be installed on workstation.
Introduction
A ConfigMap object provides mechanisms to inject containers with configuration data while keeping containers agnostic of OpenShift Container Platform. A ConfigMap can be used to store fine-grained information like individual properties or coarse-grained information like entire configuration files or JSON blobs. In the lab below we will modify the properties file of a webpage using a ConfigMap.
The ConfigMap object holds key-value pairs of configuration data that can be consumed in pods or used to store configuration data. ConfigMaps is similar to secrets but it is not recommended for sensitive data.
Exercise
Clone configmap-demo from git
$ git clone https://github.com/tosin2013/configmap-demo.git
$ cd configmap-demo
Login to OpenShift
Lets create a project
$ oc new-project workshop-configmap-lab-YourName| Change userXX to your username provided by your workshop coordinator. |
Lets set the color we would like to use
$ export COLOR=red
$ echo "color=$COLOR" > ui.properties
Let’s create a ConfigMap, named config, with both a literal text, message=YOUR MESSAGE, and the configuration file:
$ export PERSONAL_MESSAGE="YOUR MESSAGE"  # Change the message
$ oc create configmap config \
            --from-literal=message="${PERSONAL_MESSAGE}" \
            --from-file=ui.properties
Check the contents of configmap/config
$ oc get configmap/config -o jsonCreate the app deployment and build the app
$ oc create -f configmap-demo-build.yml
$ oc create -f  configmap-demo-deployment.yml
Check the deployment
$  oc get pods
NAME                      READY   STATUS      RESTARTS   AGE
configmap-demo-1-build    0/1     Completed   0          4m29s
configmap-demo-1-deploy   0/1     Completed   0          3m18s
configmap-demo-1-kshbh    1/1     Running     0          3m9s
Launch Webpage
$ oc get routesUpdate configmap
$ export COLOR=green
$ echo "color=$COLOR" > ui.properties
Delete old config map
$ oc delete configmap configLets create a new config map
$ export PERSONAL_MESSAGE="NEW MESSAGE"  # Change the message
$ oc create configmap config \
            --from-literal=message="${PERSONAL_MESSAGE}" \
            --from-file=ui.properties
Get Pod Name
$ oc get podsDelete old config map pod
$ oc delete pod configmap-demo-1-kshbhCheck pod status
$ oc get podsReload Webpage
Delete deployment
$ oc delete -f configmap-demo-build.yml
$ oc delete -f  configmap-demo-deployment.yml
Delete project
$ oc delete project workshop-configmap-lab-YourNameSummary
In this lab we learned how about configmaps and its uses. We also deployed a simple web application and modified the properties and environment using configmaps.
Using Persistent Storage
Prerequisites
-
You have access to OpenShift Web Console URL. Ask your workshop coordinator for URL if you don’t have one.
-
You have credentials to login. Ask your workshop coordinator for credentials to log onto the OpenShift cluster
Introduction
With OpenShift files that live on the container instance are ephemeral. This means that once the pod is destroyed or reinstantiated any changes to the files or data storage on the container is destoryed.
PersistentVolume (PV) is an API object, which represents a piece of existing storage in the cluster that was either statically provisioned by the cluster administrator or dynamically provisioned using a StorageClass object. It is a resource in the cluster just like a node is a cluster resource.
Types of PVs
OpenShift Container Platform supports the following
PersistentVolume plug-ins:-
AWS Elastic Block Store (EBS)
-
Azure Disk
-
Azure File
-
Cinder
-
Fibre Channel
-
GCE Persistent Disk
-
HostPath
-
iSCSI
-
Local volume
-
NFS
-
Red Hat OpenShift Container Storage
-
VMware vSphere
Bij de NPO ondersteunen wij Red Hat OpenShift Container Storage of AWS Elastic Block Store (EBS)
| Volume Plug-in | ReadWriteOnce | ReadOnlyMany | ReadWriteMany |
|---|---|---|---|
AWS EBS |
√ |
- |
- |
Azure File |
√ |
√ |
√ |
Azure Disk |
√ |
- |
- |
Cinder |
√ |
- |
- |
Fibre Channel |
√ |
√ |
- |
GCE Persistent Disk |
√ |
- |
- |
HostPath |
√ |
- |
- |
iSCSI |
√ |
√ |
- |
Local volume |
√ |
- |
- |
NFS |
√ |
√ |
√ |
Red Hat OpenShift Container Storage |
√ |
- |
√ |
vSphere |
√ |
- |
- |
PersistentVolumeClaim is an API Object, which represents a request for storage by a developer. It is similar to a Pod in that Pods consume node resources and PVCs consume PV resources. A PVC provides an abstraction layer to underlying storage. An administrator could create a number of static persistent volumes (PVs) that can later be bound to one or more persistent volume claims.
Exercise
Prepare Exercise
-
Login to OpenShift
-
Create new project
$ oc new-project workshop-pvc-demo-YourName| Change userXX to your username provided by your workshop coordinator. |
Create a Persistent Volume Claim
-
Create a pv definition file.
cat >myclaim-YourName-pvc.yml<<EOF
apiVersion: v1
kind: PersistentVolumeClaim
metadata:
  name: myclaim-YourName
  namespace: workshop-pvc-demo-YourName
spec:
  accessModes:
  - ReadWriteOnce
  resources:
    requests:
      storage: 1Gi
EOF-
Create the persistent volume claim.
oc create -f myclaim-YourName-pvc.yml-
Get pvc status*
oc get pvc-
Mount your pv to a pod by deploying sample app
cat >deploy-pvc.yml<<EOF
apiVersion: apps/v1
kind: Deployment
metadata:
  name: pv-deploy
  labels:
    app: mypv
spec:
  replicas: 1
  selector:
    matchLabels:
      app: mypv
  template:
    metadata:
      labels:
        app: mypv
    spec:
      containers:
      - name: shell
        image: centos:7
        command:
        - "bin/bash"
        - "-c"
        - "sleep 10000"
        volumeMounts:
        - name: mypd
          mountPath: "/tmp/persistent"
      volumes:
      - name: mypd
        persistentVolumeClaim:
          claimName: myclaim-YourName
EOF-
Deploy app
$ oc create -f deploy-pvc.yml
deployment.apps/pv-deploy created-
Get pod name
$ oc get pods
NAME                        READY   STATUS    RESTARTS   AGE
pv-deploy-f8d4f87f6-mlspk 1/1 Running 0 2m26s-
Review pod configuration
Name:         pv-deploy-6bd44744c4-6h5pk
Namespace:    hens-tim-test
Priority:     0
Node:         ip-10-1-156-6.eu-central-1.compute.internal/10.1.156.6
Start Time:   Thu, 10 Sep 2020 16:18:38 +0200
Labels:       app=mypv
              pod-template-hash=6bd44744c4
Annotations:  k8s.v1.cni.cncf.io/network-status:
                [{
                    "name": "openshift-sdn",
                    "interface": "eth0",
                    "ips": [
                        "10.34.5.147"
                    ],
                    "default": true,
                    "dns": {}
                }]
              k8s.v1.cni.cncf.io/networks-status:
                [{
                    "name": "openshift-sdn",
                    "interface": "eth0",
                    "ips": [
                        "10.34.5.147"
                    ],
                    "default": true,
                    "dns": {}
                }]
              kubernetes.io/limit-ranger: LimitRanger plugin set: cpu, memory request for container shell; cpu, memory limit for container shell
              openshift.io/scc: restricted
Status:       Running
IP:           10.34.5.147
IPs:
  IP:           10.34.5.147
Controlled By:  ReplicaSet/pv-deploy-6bd44744c4
Containers:
  shell:
    Container ID:  cri-o://155c9d275677553b161148e392cf781ac6ae1f2b4604584f4e5f32b538233f34
    Image:         centos:7
    Image ID:      docker.io/library/centos@sha256:19a79828ca2e505eaee0ff38c2f3fd9901f4826737295157cc5212b7a372cd2b
    Port:          <none>
    Host Port:     <none>
    Command:
      bin/bash
      -c
      sleep 10000
    State:          Running
      Started:      Thu, 10 Sep 2020 16:18:54 +0200
    Ready:          True
    Restart Count:  0
    Limits:
      cpu:     200m
      memory:  128Mi
    Requests:
      cpu:        200m
      memory:     128Mi
    Environment:  <none>
    Mounts:
      /tmp/persistent from mypd (rw)
      /var/run/secrets/kubernetes.io/serviceaccount from default-token-5twqs (ro)
Conditions:
  Type              Status
  Initialized       True
  Ready             True
  ContainersReady   True
  PodScheduled      True
Volumes:
  mypd:
    Type:       PersistentVolumeClaim (a reference to a PersistentVolumeClaim in the same namespace)
    ClaimName:  myclaim
    ReadOnly:   false
  default-token-5twqs:
    Type:        Secret (a volume populated by a Secret)
    SecretName:  default-token-5twqs
    Optional:    false
QoS Class:       Guaranteed
Node-Selectors:  <none>
Tolerations:     node.kubernetes.io/memory-pressure:NoSchedule
                 node.kubernetes.io/not-ready:NoExecute for 300s
                 node.kubernetes.io/unreachable:NoExecute for 300s
Events:
  Type    Reason                  Age        From                                                  Message
  ----    ------                  ----       ----                                                  -------
  Normal  Scheduled               <unknown>  default-scheduler                                     Successfully assigned hens-tim-test/pv-deploy-6bd44744c4-6h5pk to ip-10-1-156-6.eu-central-1.compute.internal
  Normal  SuccessfulAttachVolume  31s        attachdetach-controller                               AttachVolume.Attach succeeded for volume "pvc-3850c078-85d8-474a-a85c-d4dbc9388e4b"
  Normal  AddedInterface          25s        multus                                                Add eth0 [10.34.5.147/23]
  Normal  Pulling                 25s        kubelet, ip-10-1-156-6.eu-central-1.compute.internal  Pulling image "centos:7"
  Normal  Pulled                  15s        kubelet, ip-10-1-156-6.eu-central-1.compute.internal  Successfully pulled image "centos:7"
  Normal  Created                 15s        kubelet, ip-10-1-156-6.eu-central-1.compute.internal  Created container shell
Normal Started 15s kubelet, ip-10-1-156-6.eu-central-1.compute.internal Started container shell 3m8s kubelet, ip-10-0-159-218.us-east-2.compute.internal Started container shell-
test mount
$ oc exec -i -t  pv-deploy-f8d4f87f6-mlspk  /bin/bash
bash-4.2$ df -h
Filesystem                                                                                                                                                 Size  Used Avail Use% Mounted on
overlay                                                                                                                                                    120G   51G   69G  43% /
tmpfs                                                                                                                                                       64M     0   64M   0% /dev
tmpfs                                                                                                                                                       16G     0   16G   0% /sys/fs/cgroup
shm                                                                                                                                                         64M     0   64M   0% /dev/shm
tmpfs                                                                                                                                                       16G  7.0M   16G   1% /etc/passwd
172.30.182.236:6789,172.30.214.140:6789,172.30.32.187:6789:/volumes/csi/csi-vol-6ffe84a1-f370-11ea-9354-0a580a210620/0a35e01d-4a0f-4e92-8f0a-49dd31633d11  1.0G     0  1.0G   0% /tmp/persistent
/dev/mapper/coreos-luks-root-nocrypt                                                                                                                       120G   51G   69G  43% /etc/hosts
tmpfs                                                                                                                                                       16G   32K   16G   1% /run/secrets/kubernetes.io/serviceaccount
tmpfs                                                                                                                                                       16G     0   16G   0% /proc/acpi
tmpfs                                                                                                                                                       16G     0   16G   0% /proc/scsi
tmpfs                                                                                                                                                       16G     0   16G   0% /sys/firmware
bash-4.2$ cd /tmp/persistent
bash-4.2$ touch testfile
bash-4.2$ ls -lath
total 0
-rw-r--r--. 1 1001050000 1001050000  0 Sep 10 14:21 testfile
drwxrwsrwx. 2 root       1001050000  1 Sep 10 14:21 .
drwxrwxrwt. 1 root       root       24 Sep 10 14:18 ..
bash-4.2$ exit
exit-
Delete the deployment.
$ oc delete -f deploy-pvc.yml-
Delete the persistent volume claim.
$ oc get pvc
NAME               STATUS   VOLUME                                     CAPACITY   ACCESS MODES   STORAGECLASS   AGE
myclaim-YourName   Bound    pvc-a4a724b1-b711-40a1-a7c9-f89b7db209c7   1Gi        RWO            gp2            10m

$ oc delete pvc myclaim-YourName
persistentvolumeclaim "myclaim-YourName" deleted-
Delete Project
$ oc delete project workshop-pvc-demo-YourNameSummary
In this lab learned about persistent volumes and persistent volume claims. We then created a persistent volume claim and deployed an application.
Code Promotion
Introduction
In this lab we will learn how an application image binary can be promoted across the environments. As an example we will use development and QA environments as promotion to pre-prod and production will be very similar.
In this example we are using projects as means of separation of environments (development, qa, production).
Create and Setup Environments for Code Promotion
-
Create two projects (Development and Testing)
Using the knowledge you gained from the past create two projects. Name the first project workshop-development-YourName
$ oc new-project workshop-development-YourName
Name the second workshop-testing-YourName.
$ oc new-project testing-UserName
Remember to substitute the YourName!
-
Provide ImagePuller Access to the QA Project from Development Project
The following command will allow the QA project to be able to pull the container images from the Development project.
$ oc policy add-role-to-group system:image-puller system:serviceaccounts:workshop-testing-YourName -n workshop-development-YourName
Deploy application
-
Create an application in the development project
Switch over to the workshop-development-YourName project and deploy an application using the php s2i builder. You can use web console or
command line. The command line option is shown below.
Bonus points: Clone this application to your own github account and deploy it so that you can redeploy with changes later.
oc project workshop-development-YourName
oc new-app openshift/php~https://github.com/RedHatWorkshops/welcome-php
-
Fix the buildConfig resources
## Select the project
$ oc project workshop-development-YourName

## Now we need to find the builds
$ oc get builds

NAME              TYPE     FROM   STATUS    STARTED         DURATION
welcome-php-1     Source   Git    Running   5 seconds ago

## If the build is still running, cancel it first:
$ oc cancel-build welcome-php

## Afterwards, we need to patch the BuildConfig, which is the name of the build without the "-1"
$ oc patch bc/welcome-php --patch '{"spec":{"resources":{"limits":{"memory":"1Gi","cpu":"1000m"}}}}'

## Now, start a new build
$ oc start-build welcome-php

## You can check it's status again by running oc get builds
$ oc get builds
NAME              TYPE     FROM          STATUS                       STARTED          DURATION
welcome-php-1     Source   Git@9d448d1   Cancelled (CancelledBuild)   49 seconds ago   18s
welcome-php-2     Source   Git@9d448d1   Running                      4 seconds ago
-
Tag the Container Image
Wait until the application gets built and deployed. Now if you check the imagestreams you will find the container image for this application.
Note You can find the imagestream name using the following command. is is the
short form for imageStream.
$ oc get is
NAME          IMAGE REPOSITORY                                                                     TAGS   UPDATED
welcome-php   openshift-image-registry.apps.cluster.chp4.io/workshop-development-tim/welcome-php
Run the command again after the application is deployed. It will show you full image id and the current tags assigned to that image. You’ll notice that only latest is assigned right now.
$ oc describe is welcome-php
Name:			        welcome-php
Namespace:		    workshop-development-tim
Created:		      9 minutes ago
Labels:			      app=welcome-php
			            app.kubernetes.io/component=welcome-php
			            app.kubernetes.io/instance=welcome-php
Annotations:		  openshift.io/generated-by=OpenShiftNewApp
Image Repository:	openshift-image-registry.apps.cluster.chp4.io/workshop-development-tim/welcome-php
Image Lookup:		  local=false
Unique Images:		1
Tags:			        1

latest
  no spec tag

  * image-registry.openshift-image-registry.svc:5000/workshop-development-tim/welcome-php@sha256:ff153f20f4d653ab40f42af483a6174359b4b53a8aaf87b4d6e2fb6b0edc92e1
      2 minutes ago
In general, when you are in development, you may be building your application multiple times,and test it. When a particular image passes your tests it will be promoted to QA.
Now let us assume that this container image is good and is ready to promote to QA. Let us tag this image using the oc tag command. We will pick up the latest image built and tested and add a tag to it as promote-qa as shown below:
Remember to substitute your YourName.
Now describe the imagestream again to notice that a new tag promote-qa is applied now.
$ oc describe is welcome-php
Name:			        welcome-php
Namespace:		    workshop-development-tim
Created:		      13 minutes ago
Labels:			      app=welcome-php
			            app.kubernetes.io/component=welcome-php
			            app.kubernetes.io/instance=welcome-php
Annotations:		  openshift.io/generated-by=OpenShiftNewApp
Image Repository:	openshift-image-registry.apps.cluster.chp4.io/workshop-development-tim/welcome-php
Image Lookup:		  local=false
Unique Images:		1
Tags:			        2

latest
  no spec tag

  * image-registry.openshift-image-registry.svc:5000/workshop-development-tim/welcome-php@sha256:ff153f20f4d653ab40f42af483a6174359b4b53a8aaf87b4d6e2fb6b0edc92e1
      6 minutes ago

promote-qa
  tagged from welcome-php@sha256:ff153f20f4d653ab40f42af483a6174359b4b53a8aaf87b4d6e2fb6b0edc92e1

  * image-registry.openshift-image-registry.svc:5000/workshop-development-tim/welcome-php@sha256:ff153f20f4d653ab40f42af483a6174359b4b53a8aaf87b4d6e2fb6b0edc92e1
      About a minute ago
Step 5: Deploy the application to QA
Now you can switch over to the QA project and deploy the container image that we tagged as promote-qa. Note that the image is still in the development project. You are able to deploy that into testing project, because we gave necessary permissions for the testing project to be able to pull an image from development project.
Also expose service to create route for this project and remember to substitute YourName.
oc project testing-YourName
oc new-app workshop-development-YourName/welcome-php:promote-qa
oc expose service welcome-php
Watch this video for complete understanding.
Cleanup
Delete the Projects:
oc delete project workshop-testing-YourName
oc delete project workshop-development-YourName

== Summary

You now know how to promote your application across environments in OpenShift.
Blue/Green Deployments
Introduction
In this lab we will learn doing BlueGreen Deployments with OpenShift.
So what is Bluegreen?
Blue-green deployment is a release strategy that can be utilized by developers for deploying software in a production environment. Blue can be one particular production environment whereas green can define an identical production environment. Under blue-green deployment strategy, software developers are able to minimize downtime and reduce risk. 1*
In this Lab, we will be:
-
Deploying two versions of the same application. The first version will display a blue rectangle.
-
Create an OpenShift route (a FQDN) that can be used to expose the applications.
-
We will first expose the version 1, the blue version.
-
We will also create another version of this application in the same project that displays a green rectangle.
-
We will then switch OpenShift route from the first application (blue) to the second application (green).
Create a new project
Remember to substitute the YourName
$ oc new-project workshop-bluegreen-YourName --display-name="Blue Green Project" --description="Blue Green Project"
Deploy Blue Version and Test
List existing image builder or image streams
$ oc new-app -S --image-stream=php
Image streams (oc new-app --image-stream=<image-stream> [--code=<source>])
-----
php
  Project: openshift
  Tags:    7.2, 7.3, latest
We will be using a sample php application that displays a blue or green rectangle. The sample app can be browsed at https://github.com/RedHatWorkshops/bluegreen
We have two branches blue and green . Version 1 uses blue branch and version 2 uses green branch.
$ oc new-app --image-stream=php --code=https://github.com/RedHatWorkshops/bluegreen#blue --name=blue
Fix the build resources
$ oc get builds

NAME              TYPE     FROM   STATUS    STARTED         DURATION
blue-1            Source   Git    Running   5 seconds ago

## If the build is still running, cancel it first:
$ oc cancel-build blue-1

## Afterwards, we need to patch the BuildConfig, which is the name of the build without the "-1"
$ oc patch bc/blue --patch '{"spec":{"resources":{"limits":{"memory":"1Gi","cpu":"1000m"}}}}'

## Now, start a new build
$ oc start-build blue

## You can check it's status again by running oc get builds
$ oc get builds
NAME              TYPE     FROM          STATUS                       STARTED          DURATION
blue-1            Source   Git@blue      Cancelled (CancelledBuild)   49 seconds ago   18s
blue-2            Source   Git@3b77b0a   Running                      4 seconds ago
Monitor the application build
$ oc get builds
NAME     TYPE     FROM          STATUS                       STARTED              DURATION
blue-1   Source   Git@blue      Cancelled (CancelledBuild)   2 minutes ago        11s
blue-2   Source   Git@3b77b0a   Complete                     About a minute ago   59s
Using the build name of the recently created application run:
$ oc logs build/blue-2
Once the build finishes you should see something similar to:
...
Pushing image image-registry.openshift-image-registry.svc:5000/bluegreen-user1/blue:latest ...
Getting image source signatures
Copying blob sha256:450cddac446d5cb2b7ab48687d2b43e9207fda7364bbfe320a757793d0ed9607
Copying blob sha256:4fbc3bafa3d4400bb97a733c1fe12f2f99bf38b9d5b913d5034f29798739654d
Copying blob sha256:1cd26fbb2b2181a18c41ece85dff8b293e399e50dc3abe227b1940450bf6298b
Copying blob sha256:34971b2d1eb98e410c2802e6bb3a7f499f9c5bff1b870ed329089ecdb21cf856
Copying blob sha256:0453406be68523ccc82999f84fffc57af64e00d9be0b75169c642c952b9bf7bc
Copying blob sha256:707235ac60367dff674607b0be2e18a83daea6dc2c8fb7330dbf7de29baf094b
Copying config sha256:59c852379e346ff3e3a28ca8210d6c6a3fb65f5cdab621eaf4b1c8ba2c6ddc96
Writing manifest to image destination
Storing signatures
Successfully pushed image-registry.openshift-image-registry.svc:5000/bluegreen-user1/blue@sha256:b870a5ea982
9f678c305deadb6dec69dbeb1e22fcf87498cc8ab49d2c36f82a4
Push successful
Once build is successful, you will see running pods.
$ oc get pods
NAME            READY   STATUS      RESTARTS   AGE
blue-1-build    0/1     Completed   0          2m35s
blue-1-deploy   0/1     Completed   0          25s
blue-1-rgrdm    1/1     Running     0          17s
Notice that the build pod has exited and you now have a single instance of the application running under one single pod.
List the service
$ oc get service
Note: While we are exposing the blue service, we are actually naming the route as bluegreen as we are going to do bluegreen deployments with the same route instance.
$ oc expose service blue --name=bluegreen
Look at the route that got created now
It should look something like this
$ oc get route
NAME        HOST/PORT                                               PATH   SERVICES   PORT       TERMINATION   WILDCARD
bluegreen   bluegreen-workshop-bluegreen-tim.apps.cluster.chp4.io          blue       8080-tcp                 None
Now test the application by copying your Route URL in the browser. You should see something similar to:
At this point you have deployed an application that displays for illustration purposes a blue rectangle for version 1.
Deploy Green Version
-
Deploy a new version of this application (Same one as before with a very small change)
-
Point the previously created FQDN (route) to the new service that will be created as part of the new application creation process.
Let us deploy new green version of the application in the same way we did blue version. Make sure to name the application as `green' this time.
$ oc new-app --image-stream=php --code=https://github.com/RedHatWorkshops/bluegreen#green --name=green
-
Fix the build resources
$ oc get builds

NAME      TYPE     FROM          STATUS                       STARTED          DURATION
blue-1    Source   Git@blue      Cancelled (CancelledBuild)   5 minutes ago    11s
blue-2    Source   Git@3b77b0a   Complete                     5 minutes ago    59s
green-1   Source   Git@7ac4dc0   Running                      44 seconds ago   38s

## If the build is still running, cancel it first:
$ oc cancel-build green-1

## Afterwards, we need to patch the BuildConfig, which is the name of the build without the "-1"
$ oc patch bc/green --patch '{"spec":{"resources":{"limits":{"memory":"1Gi","cpu":"1000m"}}}}'

## Now, start a new build
$ oc start-build green

## You can check it's status again by running oc get builds
$ oc get builds
NAME      TYPE     FROM          STATUS                       STARTED          DURATION
blue-1    Source   Git@blue      Cancelled (CancelledBuild)   5 minutes ago    11s
blue-2    Source   Git@3b77b0a   Complete                     5 minutes ago    59s
green-1   Source   Git@7ac4dc0   Cancelled (CancelledBuild)   44 seconds ago   38s
-
Wait until the application is built and deployed. You should now see two services if you run:
$ oc get svc
NAME    TYPE        CLUSTER-IP       EXTERNAL-IP   PORT(S)             AGE
blue    ClusterIP   172.30.240.196   <none>        8080/TCP,8443/TCP   15m
green   ClusterIP   172.30.128.91    <none>        8080/TCP,8443/TCP   12s
Switching from Blue to Green
Check the route again and note that it is still pointing to blue service.
$ oc get routes
NAME        HOST/PORT                                               PATH   SERVICES   PORT       TERMINATION   WILDCARD
bluegreen   bluegreen-workshop-bluegreen-tim.apps.cluster.chp4.io          blue       8080-tcp                 None

$ oc set route-backends bluegreen
NAME              KIND     TO    WEIGHT
routes/bluegreen  Service  blue  100
The command oc set route-backends will show how the traffic is flowing from the route to the backend service.
Now let us change the route to send all the traffic to green by running
$ oc set route-backends bluegreen green=100
route.route.openshift.io/bluegreen backends updated
So by doing this we updated the route named bluegreen to send all the traffic to green service backend.
You can confirm the change is made in two ways
$ oc set route-backends bluegreen
NAME              KIND     TO     WEIGHT
routes/bluegreen  Service  green  100

$ oc get route bluegreen
NAME        HOST/PORT                                               PATH   SERVICES   PORT       TERMINATION   WILDCARD
bluegreen   bluegreen-workshop-bluegreen-tim.apps.cluster.chp4.io          green      8080-tcp                 None
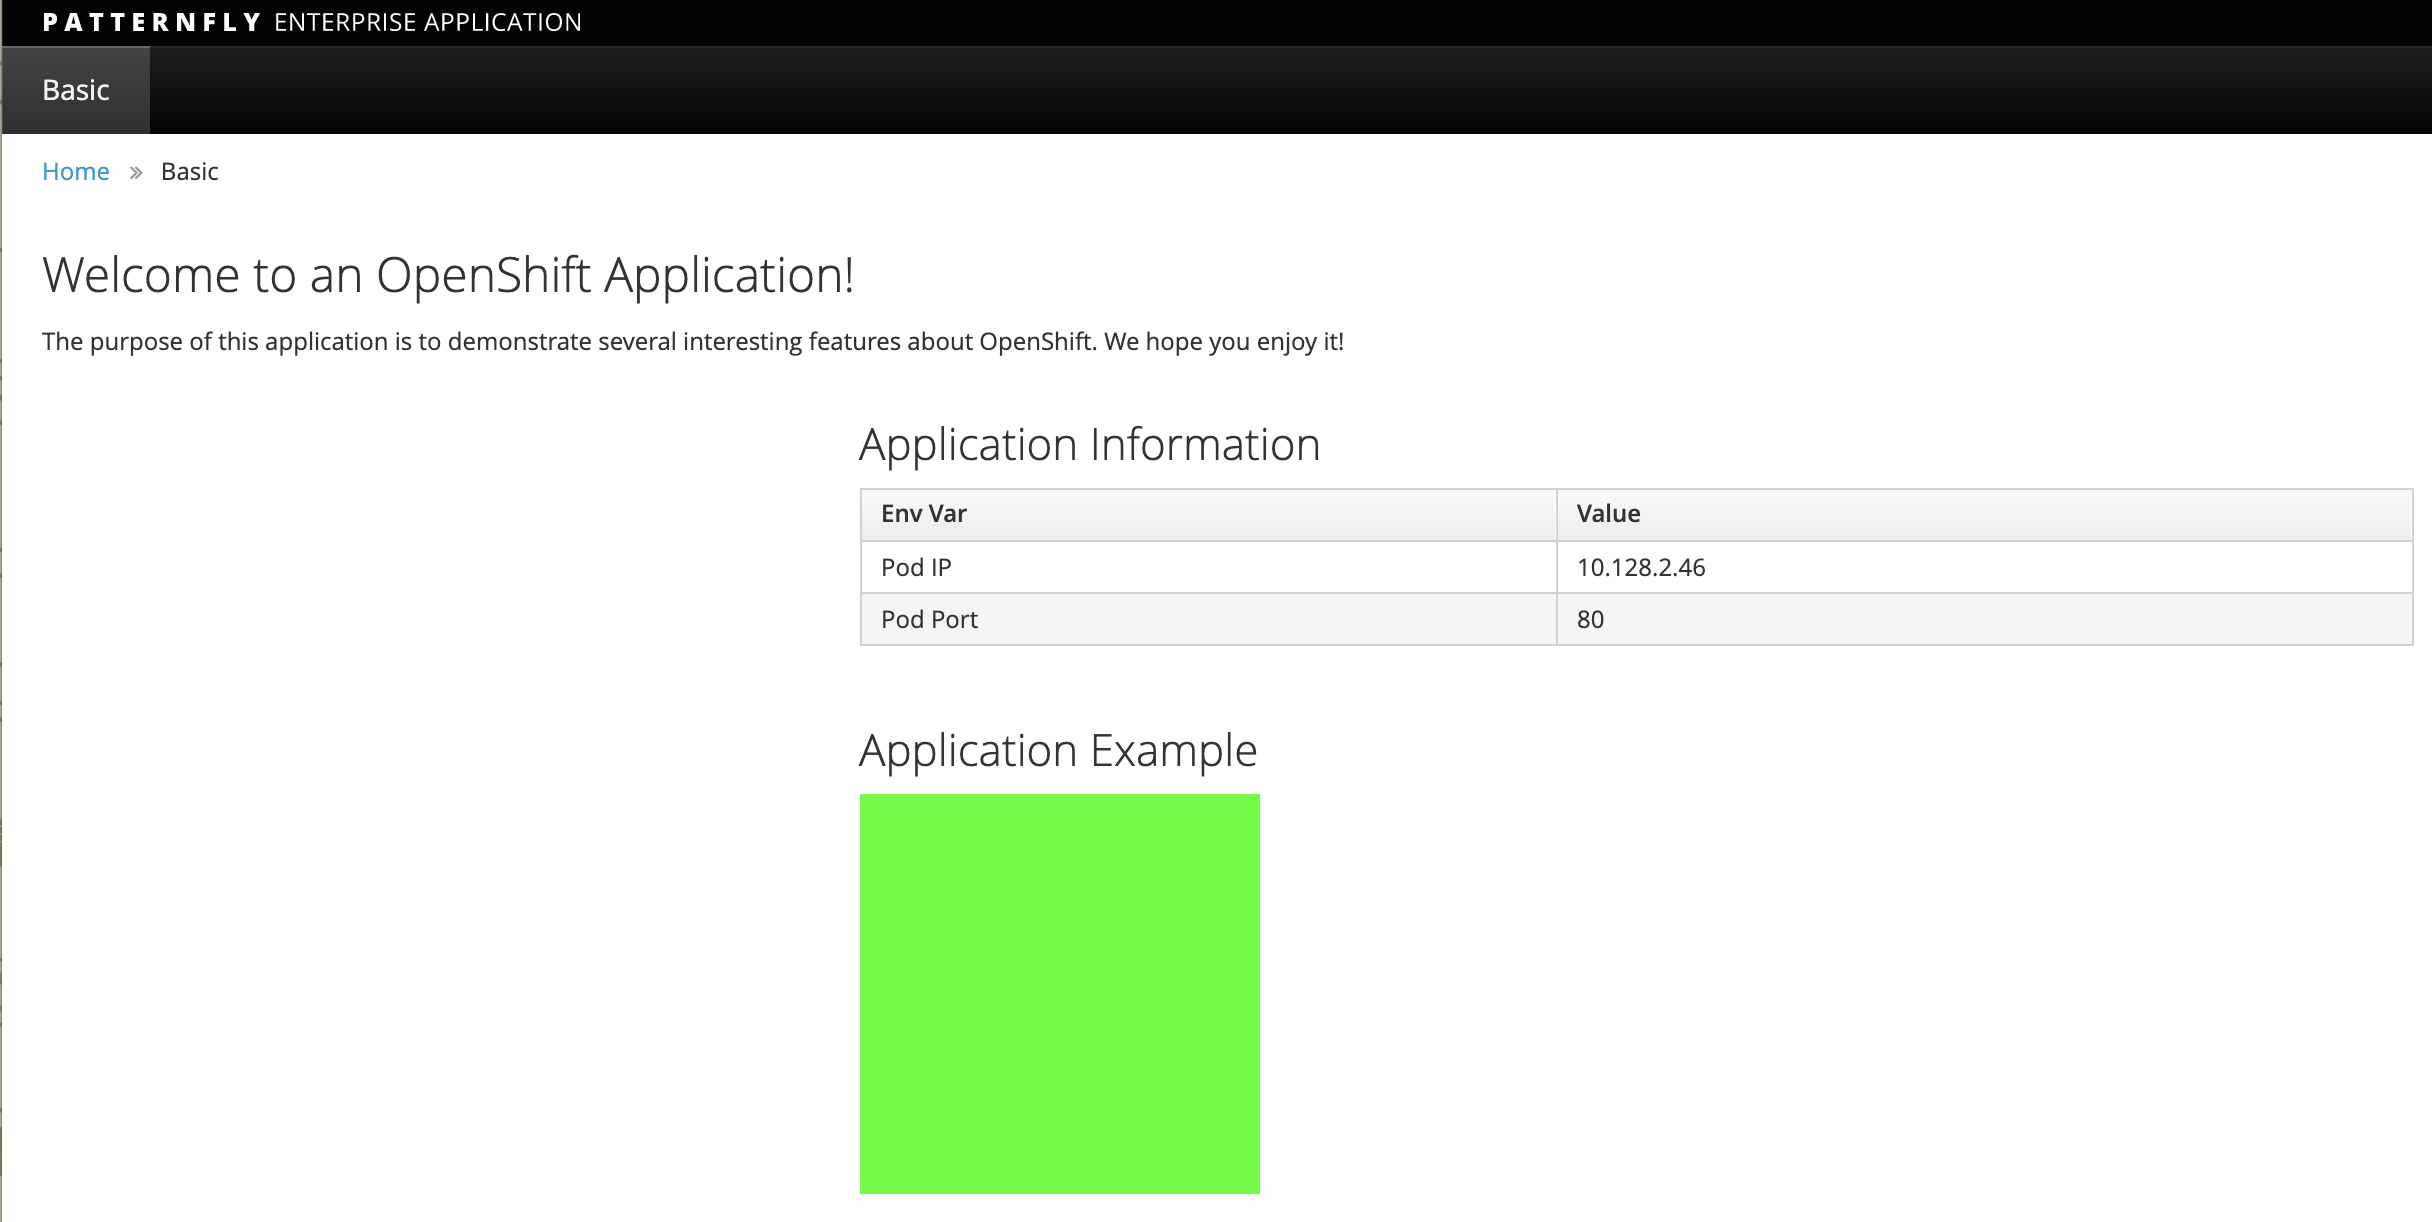
Let us test the application by using th same route in the browser
You should now see the new version of the recently deployed application with a green rectangle as below.
Clean up
-
Delete application
oc delete all --all
-
Delete the project; substituting the YourName in the command below
oc delete project workshop-bluegreen-YourName
Summary
-
Blue-Green deployments can be easily accomplished on OpenShift.
-
We have shown multiple versions of an application; all running concurrently, each with a unique service.
-
All that is needed to expose any of the applications is to change the service being used by the route to publicly advertise the application.
-
You can split traffic across two services
A/B Testing
Introduction
With AB Testing you can introduce a new version of application and split traffic to the new version gradually instead of suddenly switching from one version to another.
In this lab we will deploy two versions of the same application (app-a and app-b). Then we will configure the route in such a way that the traffic initially would be going to first version (app-a) and then we will gradually shift traffic from app-a to app-b.
Deploy app-a
-
Create a new project. Remember to substitute your YourName.
oc new-project workshop-abtest-YourName
-
Deploy an application
oc new-app --image-stream=php --code=https://github.com/RedHatWorkshops/ab-deploy --name=app-a
-
Fix the buildConfig
$ oc get builds

NAME      TYPE     FROM          STATUS    STARTED          DURATION
app-a-1   Source   Git@e2f2dd9   Running   16 seconds ago

## If the build is still running, cancel it first:
$ oc cancel-build app-a-1

## Afterwards, we need to patch the BuildConfig, which is the name of the build without the "-1"
$ oc patch bc/app-a --patch '{"spec":{"resources":{"limits":{"memory":"1Gi","cpu":"1000m"}}}}'

## Now, start a new build
$ oc start-build app-a

## You can check it's status again by running oc get builds
$ oc get builds
NAME      TYPE     FROM          STATUS                       STARTED              DURATION
app-a-1   Source   Git@e2f2dd9   Cancelled (CancelledBuild)   About a minute ago   22s
app-a-2   Source   Git@e2f2dd9   Complete                     About a minute ago   51s
-
Create a route and name it
abtest
oc expose service app-a --name=abtest
-
Verify the route created and note the URL
oc get route
-
Wait until build completes by watching build logs
oc logs builds/app-a-1
-
Ensure app is deployed
$ oc get po
NAME                     READY   STATUS      RESTARTS   AGE
app-a-2-build            0/1     Completed   0          2m2s
app-a-6cfbbfbb8d-qzbrb   1/1     Running     0          71s
-
Test the app
$ oc get route abtest

# Replace <route> with the hostname found with oc get route.

$ curl <route>
 I am VERSION 1 <br><br>My Pod IP is : 10.129.2.39
This shows I am VERSION 1 as the output.
Let us run curl 20 times with for i in {1..20}; do curl -w "\n" <route>; done
# Replace <route> with the hostname found with oc get route.

$ for i in {1..20}; do curl -w "\n" <route>); done
 I am VERSION 1 <br><br>My Pod IP is : 10.129.2.39
 I am VERSION 1 <br><br>My Pod IP is : 10.129.2.39
 I am VERSION 1 <br><br>My Pod IP is : 10.129.2.39
 I am VERSION 1 <br><br>My Pod IP is : 10.129.2.39
 I am VERSION 1 <br><br>My Pod IP is : 10.129.2.39
 I am VERSION 1 <br><br>My Pod IP is : 10.129.2.39
 I am VERSION 1 <br><br>My Pod IP is : 10.129.2.39
 I am VERSION 1 <br><br>My Pod IP is : 10.129.2.39
 I am VERSION 1 <br><br>My Pod IP is : 10.129.2.39
 I am VERSION 1 <br><br>My Pod IP is : 10.129.2.39
 I am VERSION 1 <br><br>My Pod IP is : 10.129.2.39
 I am VERSION 1 <br><br>My Pod IP is : 10.129.2.39
 I am VERSION 1 <br><br>My Pod IP is : 10.129.2.39
 I am VERSION 1 <br><br>My Pod IP is : 10.129.2.39
 I am VERSION 1 <br><br>My Pod IP is : 10.129.2.39
 I am VERSION 1 <br><br>My Pod IP is : 10.129.2.39
 I am VERSION 1 <br><br>My Pod IP is : 10.129.2.39
 I am VERSION 1 <br><br>My Pod IP is : 10.129.2.39
 I am VERSION 1 <br><br>My Pod IP is : 10.129.2.39
 I am VERSION 1 <br><br>My Pod IP is : 10.129.2.39
It always hits version 1.
Deploy app-b
-
We have a separate branch
v2. Same exact app with a small change. This will be namedapp-b
oc new-app --image-stream=php --code=https://github.com/RedHatWorkshops/ab-deploy#v2 --name=app-b
-
Fix the buildConfig
$ oc get builds

NAME      TYPE     FROM          STATUS    STARTED          DURATION
app-a-1   Source   Git@e2f2dd9   Running   16 seconds ago
app-b-1   Source   Git@v2        Running   16 seconds ago

## If the build is still running, cancel it first:
$ oc cancel-build app-b-1

## Afterwards, we need to patch the BuildConfig, which is the name of the build without the "-1"
$ oc patch bc/app-b --patch '{"spec":{"resources":{"limits":{"memory":"1Gi","cpu":"1000m"}}}}'

## Now, start a new build
$ oc start-build app-b

## You can check it's status again by running oc get builds
$ oc get builds
NAME      TYPE     FROM          STATUS                       STARTED              DURATION
app-a-1   Source   Git@e2f2dd9   Cancelled (CancelledBuild)   About a minute ago   22s
app-a-2   Source   Git@e2f2dd9   Complete                     About a minute ago   51s
app-b-1   Source   Git@v2        Cancelled (CancelledBuild)   About a minute ago   7s
app-b-2   Source   Git@v2        Running                      6 seconds ago
-
Watch and Wait until build completes
oc logs builds/app-b-1 -f
-
Note the service created is also called
app-b
oc get svc
Introducing app-b as Canary
Now we will do AB testing by splitting traffic between services app-a and app-b. We want to send a small amount of traffic to app-b.
-
Look at the backends for our route
abtest
$ oc set route-backends abtest
NAME           KIND     TO     WEIGHT
routes/abtest  Service  app-a  100
You can see that all the traffic going to service`app-a`
-
Let us send 10% of traffic to service
app-b, so that it acts as a canary receiving 1 out of 10 requests
$ oc set route-backends abtest app-a=9 app-b=1
route.route.openshift.io/abtest backends updated
Verify the setting now
$ oc set route-backends abtest
NAME           KIND     TO     WEIGHT
routes/abtest  Service  app-a  9 (90%)
routes/abtest  Service  app-b  1 (10%)
It shows that the traffic is now split between services app-a and app-b in the ratio of 90% and 10%.
-
Test the app now
Let us again run curl 20 times with for i in {1..20}; do curl -w "\n" <route>; done
You’ll see out of every 10 requests 9 go to service app-a and 1 goes to service app-b
$ for i in {1..20}; do curl -w "\n" <route>; done
 I am VERSION 1 <br><br>My Pod IP is : 10.129.2.39
 I am VERSION 1 <br><br>My Pod IP is : 10.129.2.39
 I am VERSION 1 <br><br>My Pod IP is : 10.129.2.39
 I am VERSION 1 <br><br>My Pod IP is : 10.129.2.39
 I am VERSION 1 <br><br>My Pod IP is : 10.129.2.39
 I am VERSION 2 <br><br>My Pod IP is : 10.128.2.48
 I am VERSION 1 <br><br>My Pod IP is : 10.129.2.39
 I am VERSION 1 <br><br>My Pod IP is : 10.129.2.39
 I am VERSION 1 <br><br>My Pod IP is : 10.129.2.39
 I am VERSION 1 <br><br>My Pod IP is : 10.129.2.39
 I am VERSION 1 <br><br>My Pod IP is : 10.129.2.39
 I am VERSION 1 <br><br>My Pod IP is : 10.129.2.39
 I am VERSION 1 <br><br>My Pod IP is : 10.129.2.39
 I am VERSION 1 <br><br>My Pod IP is : 10.129.2.39
 I am VERSION 1 <br><br>My Pod IP is : 10.129.2.39
 I am VERSION 1 <br><br>My Pod IP is : 10.129.2.39
 I am VERSION 1 <br><br>My Pod IP is : 10.129.2.39
 I am VERSION 2 <br><br>My Pod IP is : 10.128.2.48
 I am VERSION 1 <br><br>My Pod IP is : 10.129.2.39
 I am VERSION 1 <br><br>My Pod IP is : 10.129.2.39
This is the behavior of a Canary deployment.
It is used to test your new application and see how it responds in the real world. If the application works as intended, you can increase the amount of traffic to the new version. If there were to be any problems, you can easily shift the traffic back to the old version.
Adjust the traffic split percentages
-
Let us make it 50-50 split this time
$ oc set route-backends abtest --adjust app-b=50%
route.route.openshift.io/abtest backends updated
and verify the change to note 50-50 split
$ oc set route-backends abtest
NAME           KIND     TO     WEIGHT
routes/abtest  Service  app-a  50 (50%)
routes/abtest  Service  app-b  50 (50%)
-
Test again and note the traffic is evenly distributed between the two versions
$ for i in {1..20}; do curl -w "\n" <route>>; done
 I am VERSION 1 <br><br>My Pod IP is : 10.129.2.39
 I am VERSION 2 <br><br>My Pod IP is : 10.128.2.48
 I am VERSION 1 <br><br>My Pod IP is : 10.129.2.39
 I am VERSION 2 <br><br>My Pod IP is : 10.128.2.48
 I am VERSION 1 <br><br>My Pod IP is : 10.129.2.39
 I am VERSION 2 <br><br>My Pod IP is : 10.128.2.48
 I am VERSION 1 <br><br>My Pod IP is : 10.129.2.39
 I am VERSION 2 <br><br>My Pod IP is : 10.128.2.48
 I am VERSION 1 <br><br>My Pod IP is : 10.129.2.39
 I am VERSION 2 <br><br>My Pod IP is : 10.128.2.48
 I am VERSION 1 <br><br>My Pod IP is : 10.129.2.39
 I am VERSION 2 <br><br>My Pod IP is : 10.128.2.48
 I am VERSION 1 <br><br>My Pod IP is : 10.129.2.39
 I am VERSION 2 <br><br>My Pod IP is : 10.128.2.48
 I am VERSION 1 <br><br>My Pod IP is : 10.129.2.39
 I am VERSION 2 <br><br>My Pod IP is : 10.128.2.48
 I am VERSION 1 <br><br>My Pod IP is : 10.129.2.39
 I am VERSION 2 <br><br>My Pod IP is : 10.128.2.48
 I am VERSION 1 <br><br>My Pod IP is : 10.129.2.39
 I am VERSION 2 <br><br>My Pod IP is : 10.128.2.48
Shift to new version
-
Let us completely shift to the new version
$ oc set route-backends abtest --adjust app-b=100%
route.route.openshift.io/abtest backends updated

$ oc set route-backends abtest
NAME           KIND     TO     WEIGHT
routes/abtest  Service  app-a  0 (0%)
routes/abtest  Service  app-b  100 (100%)
-
Test again
$ for i in {1..20}; do curl -w "\n" <route>; done
 I am VERSION 2 <br><br>My Pod IP is : 10.128.2.48
 I am VERSION 2 <br><br>My Pod IP is : 10.128.2.48
 I am VERSION 2 <br><br>My Pod IP is : 10.128.2.48
 I am VERSION 2 <br><br>My Pod IP is : 10.128.2.48
 I am VERSION 2 <br><br>My Pod IP is : 10.128.2.48
 I am VERSION 2 <br><br>My Pod IP is : 10.128.2.48
 I am VERSION 2 <br><br>My Pod IP is : 10.128.2.48
 I am VERSION 2 <br><br>My Pod IP is : 10.128.2.48
 I am VERSION 2 <br><br>My Pod IP is : 10.128.2.48
 I am VERSION 2 <br><br>My Pod IP is : 10.128.2.48
 I am VERSION 2 <br><br>My Pod IP is : 10.128.2.48
 I am VERSION 2 <br><br>My Pod IP is : 10.128.2.48
 I am VERSION 2 <br><br>My Pod IP is : 10.128.2.48
 I am VERSION 2 <br><br>My Pod IP is : 10.128.2.48
 I am VERSION 2 <br><br>My Pod IP is : 10.128.2.48
 I am VERSION 2 <br><br>My Pod IP is : 10.128.2.48
 I am VERSION 2 <br><br>My Pod IP is : 10.128.2.48
 I am VERSION 2 <br><br>My Pod IP is : 10.128.2.48
 I am VERSION 2 <br><br>My Pod IP is : 10.128.2.48
 I am VERSION 2 <br><br>My Pod IP is : 10.128.2.48
Notice that all the traffic is now hitting the new version.
Clean up
-
Delete application
oc delete all --all
-
Delete the project; substituting the YourName in the command below
oc delete project workshop-abtest-YourName
Summary
In this lab we have learnt Canary and AB Testing to gradually shift the traffic from one version to another.
Troubleshooting Applications
Table of Contents
Prerequisites
-
You have access to OpenShift Web Console URL. Ask your workshop coordinator for URL if you don’t have one.
-
You have credentials to login. Ask your workshop coordinator for credentials to log onto the OpenShift cluster
Introduction
Below are common application troubleshooting techniques to use while developing an application. We will perform different exercises to see how to resolve different issues that may come up while developing your application.
Exercises
Prepare Exercise
-
Login to OpenShift
-
Create new project
$ oc new-project workshop-troubleshooting-apps-YourName| Change YourName to your name. |
Image Pull Failures
Things to consider.. Why did the container fail to pull
-
Image tags is incorrect
-
Images doesn’t exist (or is in a different registry)
-
Kubernetes doesn’t have permissions to pull that image
Create image that fails pull
$ oc run fail --image=tcij1013/dne:v1.0.0Check the status of the image
oc get pods
NAME   READY   STATUS         RESTARTS   AGE
fail   0/1     ErrImagePull   0          11s
Inspect the pod
$ oc describe pod failAs we can see in the Events the pod failed because it could not pull down the image.
Events:
  Type     Reason          Age                From                                                  Message
  ----     ------          ----               ----                                                  -------
  Normal   Scheduled       44s                default-scheduler                                     Successfully assigned workshop-troubleshooting-apps-tim/fail to ip-10-1-156-6.eu-central-1.compute.internal
  Normal   AddedInterface  42s                multus                                                Add eth0 [10.34.4.227/23]
  Normal   Pulling         19s (x2 over 42s)  kubelet, ip-10-1-156-6.eu-central-1.compute.internal  Pulling image "tcij1013/dne:v1.0.0"
  Warning  Failed          16s (x2 over 35s)  kubelet, ip-10-1-156-6.eu-central-1.compute.internal  Failed to pull image "tcij1013/dne:v1.0.0": rpc error: code = Unknown desc = Error reading manifest v1.0.0 in docker.io/tcij1013/dne: errors:
denied: requested access to the resource is denied
unauthorized: authentication required
  Warning  Failed   16s (x2 over 35s)  kubelet, ip-10-1-156-6.eu-central-1.compute.internal  Error: ErrImagePull
  Normal   BackOff  3s (x2 over 34s)   kubelet, ip-10-1-156-6.eu-central-1.compute.internal  Back-off pulling image "tcij1013/dne:v1.0.0"
  Warning  Failed   3s (x2 over 34s)   kubelet, ip-10-1-156-6.eu-central-1.compute.internal  Error: ImagePullBackOff
Delete the pod
$ oc delete pod/fail
pod "fail" deleted
Invalid ConfigMap or Secret
Create one bad configmap yaml file
$ cat >bad-configmap-pod.yml<<YAML
# bad-configmap-pod.yml
apiVersion: v1
kind: Pod
metadata:
  name: configmap-pod
spec:
  containers:
    - name: test-container
      image: gcr.io/google_containers/busybox
      command: [ "/bin/sh", "-c", "env" ]
      env:
        - name: SPECIAL_LEVEL_KEY
          valueFrom:
            configMapKeyRef:
              name: special-config
              key: special.how
YAML
Create the bad configmap pod deployment
$ oc create -f bad-configmap-pod.ymlWhen we are getting the status of the pod we see that we have a CreateContainerConfigError
$ oc get pods
NAME            READY   STATUS                       RESTARTS   AGE
configmap-pod   0/1     CreateContainerConfigError   0          31s
When we run the oc describe command we see under Events an Error that show that the configmap could not be found.
$ oc describe pod configmap-pod
Events:
  Type     Reason          Age               From                                                  Message
  ----     ------          ----              ----                                                  -------
  Normal   Scheduled       13s               default-scheduler                                     Successfully assigned workshop-troubleshooting-apps-tim/configmap-pod to ip-10-1-156-6.eu-central-1.compute.internal
  Normal   AddedInterface  11s               multus                                                Add eth0 [10.34.4.236/23]
  Normal   Pulling         9s (x2 over 11s)  kubelet, ip-10-1-156-6.eu-central-1.compute.internal  Pulling image "gcr.io/google_containers/busybox"
  Normal   Pulled          8s (x2 over 9s)   kubelet, ip-10-1-156-6.eu-central-1.compute.internal  Successfully pulled image "gcr.io/google_containers/busybox"
  Warning  Failed          8s (x2 over 9s)   kubelet, ip-10-1-156-6.eu-central-1.compute.internal  Error: configmap "special-config" not found
Delete the bad configmap deployment
$ oc delete -f bad-configmap-pod.ymlValidation Errors
Lets validate a sample nginx app
$ cat >validate-deployment.yaml<<EOF
apiVersion: apps/vl
kind: Deployment
metadata:
  name: nginx-deployment
spec:
  selector:
    matchLabels:
      app: nginx
  replicas: 1
  template:
    metadata:
      labels:
        app: nginx
    spec:
      containers:
      - name: nginx
        image: nginx:1.7.9
        ports:
        - containerPort: 80
EOF
Run the oc apply command with --dry-run --validate=true flags
$ oc apply -f validate-deployment.yaml --dry-run --validate=true
error: unable to recognize "validate-deployment.yaml": no matches for kind "Deployment" in version "apps/vl"rue
Add two extra spaces to annotations under metadata in the validate-deployment.yaml
$  cat validate-deployment.yaml
apiVersion: apps/vl
kind: Deployment
  metadata:
  name: nginx-deployment
Check for any spacing error using the python -c command
$  python -c 'import yaml,sys;yaml.safe_load(sys.stdin)' <  validate-deployment.yaml
Traceback (most recent call last):
  File "<string>", line 1, in <module>
  File "/usr/lib64/python2.7/site-packages/yaml/__init__.py", line 93, in safe_load
    return load(stream, SafeLoader)
  File "/usr/lib64/python2.7/site-packages/yaml/__init__.py", line 71, in load
    return loader.get_single_data()
  File "/usr/lib64/python2.7/site-packages/yaml/constructor.py", line 37, in get_single_data
    node = self.get_single_node()
  File "/usr/lib64/python2.7/site-packages/yaml/composer.py", line 36, in get_single_node
    document = self.compose_document()
  File "/usr/lib64/python2.7/site-packages/yaml/composer.py", line 55, in compose_document
    node = self.compose_node(None, None)
  File "/usr/lib64/python2.7/site-packages/yaml/composer.py", line 84, in compose_node
    node = self.compose_mapping_node(anchor)
  File "/usr/lib64/python2.7/site-packages/yaml/composer.py", line 127, in compose_mapping_node
    while not self.check_event(MappingEndEvent):
  File "/usr/lib64/python2.7/site-packages/yaml/parser.py", line 98, in check_event
    self.current_event = self.state()
  File "/usr/lib64/python2.7/site-packages/yaml/parser.py", line 428, in parse_block_mapping_key
    if self.check_token(KeyToken):
  File "/usr/lib64/python2.7/site-packages/yaml/scanner.py", line 116, in check_token
    self.fetch_more_tokens()
  File "/usr/lib64/python2.7/site-packages/yaml/scanner.py", line 220, in fetch_more_tokens
    return self.fetch_value()
  File "/usr/lib64/python2.7/site-packages/yaml/scanner.py", line 580, in fetch_value
    self.get_mark())
yaml.scanner.ScannerError: mapping values are not allowed here
  in "<stdin>", line 3, column 11
Change apiVersion back to v1 and correct spacing
$ cat validate-deployment.yaml
apiVersion: apps/v1
kind: Deployment
  metadata:
  name: nginx-deployment
Validate YAML
$ python -c 'import yaml,sys;yaml.safe_load(sys.stdin)' <  validate-deployment.yaml
$ oc apply -f validate-deployment.yaml --dry-run --validate=true
deployment.apps/nginx-deployment created (dry run)
Container not updating
An example of a container not updating can be due to the following scenario
Creating a deployment using an image tag (e.g. tcij1013/myapp:v1)
-
Notice there is a bug in myapp
-
Build a new image and push the to the same tag (tcij1013/myapp:v1)
-
Delete all the myapp Pods, and watch the new ones get created by the deployment
-
Realize that the bug is still present
-
This problem relates to how Kubernetes decide weather to go do a docker pull when starting a container in a Pod.
In the V1.Container specification there’s an option call ImagePullPolicy:
Image pull policy. One of Always, Never, IfNotPresent. Defaults to Always if :latest tag is specified, or IfNotPresent otherwise.
Since the image is tagged as v1 in the above example the default pull policy is IfNotPresent. The OpenShift cluster already has a local copy of tcij1013/myapp:v1, so it does not attempt to do a docker pull. When the new Pods come up, there still using thee old broken container image.
Ways to resolve this issue
-
Use unique tags (e.g. based on your source control commit id)
-
Specify ImagePullPolicy: Always in your deployment.
-
Delete project
-
$ oc delete project workshop-troubleshooting-apps-YourNameSummary
In this lab we learned how to troubleshoot the following
-
Image Pull Failures
-
Application Crashing
-
Invalid ConfigMap or Secrets
-
Liveness/Readiness Probe Failure
-
Validation Errors
-
Container not updating