oc new-project workshop-scale-up-down-YourName7 Application Scaling
Introduction
In this exercise we will learn how to scale our application. OpenShift has the capability to scale your application based on the workload.
First we will deploy an application, scale it up and down manually. We will also learn Idling which is a unique concept in OpenShift.
Then we will learn to setup horizontal pod autocaler that automatically scales your application based on the workload and scales down when the workload reduces.
Deploy an Application to Scale
Create a new Project
Replace YourName with your name before creating the project.
Deploy an application*
We will deploy a simple PHP application that has index.php which does some computation. You can deploy using web console or CLI. Steps below show the deployment using CLI by running oc new-app --image-stream=php --code=https://github.com/RedHatWorkshops/hpademo as shown below
oc new-app --image-stream=php --code=https://github.com/RedHatWorkshops/hpademo
--> Found image 275ad31 (2 months old) in image stream "openshift/php" under tag "8.0-ubi8" for "php"

    Apache 2.4 with PHP 8.0
    -----------------------
    PHP 8.0 available as container is a base platform for building and running various PHP 8.0 applications and frameworks. PHP is an HTML-embedded scripting language. PHP attempts to make it easy for developers to write dynamically generated web pages. PHP also offers built-in database integration for several commercial and non-commercial database management systems, so writing a database-enabled webpage with PHP is fairly simple. The most common use of PHP coding is probably as a replacement for CGI scripts.

    Tags: builder, php, php80, php-80

    * The source repository appears to match: php
    * A source build using source code from https://github.com/RedHatWorkshops/hpademo will be created
      * The resulting image will be pushed to image stream tag "hpademo:latest"
      * Use 'oc start-build' to trigger a new build

--> Creating resources ...
    imagestream.image.openshift.io "hpademo" created
    buildconfig.build.openshift.io "hpademo" created
    deployment.apps "hpademo" created
    service "hpademo" created
--> Success
    Build scheduled, use 'oc logs -f buildconfig/hpademo' to track its progress.
    Application is not exposed. You can expose services to the outside world by executing one or more of the commands below:
     'oc expose service/hpademo'
    Run 'oc status' to view your app.
Create a route by exposing the service
$ oc expose svc hpademo
route.route.openshift.io/hpademo exposed
Run oc get route to get the URL for your application. Eventually your application gets built and deployed.
$ oc get route
NAME      HOST/PORT                                                                   PATH   SERVICES   PORT       TERMINATION   WILDCARD
hpademo   hpademo-workshop-scale-up-down-maurice.apps.cluster.chp5-test.npocloud.nl          hpademo    8080-tcp                 None
If you curl the URL you will see that the index.php page does some computation and displays OK!
curl hpademo-$yourProject.apps.chp5-test.npocloud.nl
OK!
Scaling
Understanding Replicas Setting in Deployment Configuration vs Replication Controller
Check the deployment configuration for this application by running oc get deployment/hpademo -o yaml and focus on spec
...
spec:
  ...
  replicas: 1
  ...
...
You’ll notice that the replicas: is set to 1. This tells OpenShift that when this application deploys, make sure that there is 1 instance running.
Manual Scaling
To scale your application we will edit the deployment to 3.
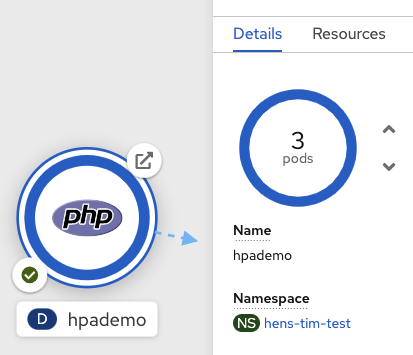
Open your browser to the Topology page and note you only have one instance running. It shows when you hover over the deployment.

Now scale your application using the oc scale command (remembering to specify the dc)
$ oc scale --replicas=3 deployment/hpademo
deployment.apps/hpademo scaled
If you look at the web console and you will see that there are 3 instances running now
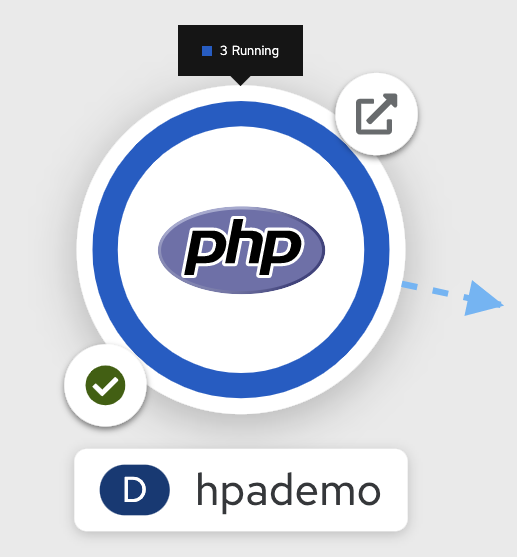
Note: You can also scale up and down from the web console by navigating to overview page and clicking twice on up arrow right next to the pod count circle to change replica count.
On the command line, see how many pods you are running now:
$ oc get pods
NAME               READY   STATUS      RESTARTS   AGE
AME                       READY   STATUS      RESTARTS   AGE
hpademo-1-build            0/1     Completed   0          43m
hpademo-684cd45d56-4f2xj   1/1     Running     0          42m
hpademo-684cd45d56-92sh6   1/1     Running     0          76s
hpademo-684cd45d56-pfhfw   1/1     Running     0          76s
You now have 3 instances of hpademo-1 running (each with a different pod-id).
Idling
A related concept is application idling. OpenShift allows you to conserve resources by sleeping the application when not in use. When you try to use the application it will spin up the container automagically.
Idling the application
Run the following command to find the available endpoints
$ oc get endpoints
NAME      ENDPOINTS                                                        AGE
hpademo   10.128.2.37:8443,10.129.2.29:8443,10.130.2.28:8443 + 3 more...   37m
Note that the name of the endpoints is hpademo and there are three ip addresses for the three pods.
Run the oc idle endpoints/hpademo command to idle the application
$ oc idle endpoints/hpademo
The service "scaling-user1/hpademo" has been marked as idled
The service will unidle Deployment "scaling-user1/hpademo" to 3 replicas once it receives traffic
Deployment "scaling-user1/hpademo" has been idled
Go back to the web console. You will notice that the pods show up as idled.
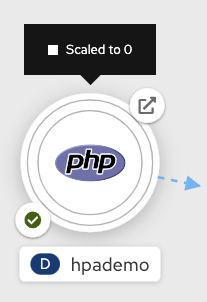
At this point the application is idled, the pods are not running and no resources are being used by the application. This doesn’t mean that the application is deleted. The current state is just saved.. that’s all.
Reactivate your application
Now click on the application route URL or access the application via curl.
Note that it takes a little while for the application to respond. This is because pods are spinning up again. You can notice that in the web console.
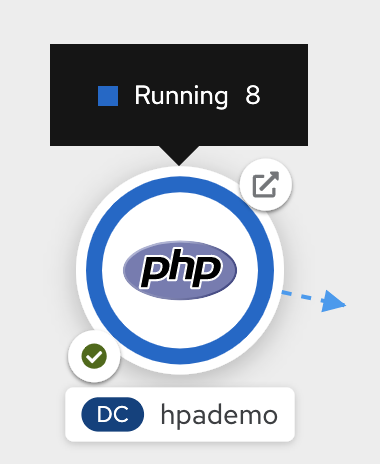
In a little while the output comes up and your application would be up with 3 pods (based on your replica count).
So, as soon as the user accesses the application, it comes up!!!
Scaling Down
Scaling down is the same procedure as scaling up. Use the oc scale
command on the hpademo application deployment setting.
$ oc scale --replicas=1 deployment/hpademo

deployment.apps/hpademo scaled
Alternately, you can go to project overview page and click on down arrow twice to remove 2 running pods.
Auto Scaling
Horizontal Pod AutoScaler (HPA) allows you to automatically scale your application based on the workload. It updates replicacount by watching the workload.
Set Resource Limits on your application
HPA requires your pods to have requests and limits set so that it knows when to scale the application based on the consumption of resources.
Let us update the deployment to set the resources by running oc set resources
$ oc set resources deployment hpademo --requests=cpu=200m --limits=cpu=500m
deployment.apps/hpademo resource requirements updated
We have set the CPU request (initial allocation) as 200 millicores and limit (maximum allocation) to 500 millicores. So when we ask HPA to scale based on percentage workload, it measures based on these numbers.
Set up HPA
Now we will create HPA by running oc autoscale command
$ oc autoscale deployment hpademo --cpu-percent=50 --min=1 --max=10
horizontalpodautoscaler.autoscaling/hpademo autoscaled
Here we are did two things:
-
cpu-percent=50indicates that when the CPU usage (based on requests and limits) reaches 50%, HPA should spin up additional pods -
--min=1 --max=10sets upper and lower limits for the number of pods. We want to run minimum 1 pod and maximum it can scale up to 10 pods. Why? We cannot allow our application to consume all resources on the cluster.. right?
Generate Load
Now it is time to generate load and test
Open a local terminal and run apache benchmark or another load generator.
$ ab -n 1000 -c 100 http://hpademo-workshop-scale-up-down-maurice.apps.cluster.chp5-test.npocloud.nl/Watch Scaling
In the other terminal, run oc get hpa hpademo -w to watch how the load goes up. After a little while once the application scale up to a few pods, stop the load by pressing ^C. And you can watch the application scaling down.
You can also see the number of pods go up on webconsole
NOTE Scale up takes a few mins and so does Scale down. So be patient.
$ oc get hpa -w
NAME      REFERENCE            TARGETS         MINPODS   MAXPODS   REPLICAS   AGE
hpademo   Deployment/hpademo   <unknown>/50%   1         10        1          72s
hpademo   Deployment/hpademo   0%/50%          1         10        1          75s
hpademo   Deployment/hpademo   13%/50%         1         10        1          90s
hpademo   Deployment/hpademo   36%/50%         1         10        1          2m15s
hpademo   Deployment/hpademo   69%/50%         1         10        1          2m30s
hpademo   Deployment/hpademo   68%/50%         1         10        2          2m45s
hpademo   Deployment/hpademo   95%/50%         1         10        2          3m
hpademo   Deployment/hpademo   94%/50%         1         10        2          3m15s
hpademo   Deployment/hpademo   117%/50%        1         10        2          3m31s
hpademo   Deployment/hpademo   124%/50%        1         10        3          3m46s
hpademo   Deployment/hpademo   137%/50%        1         10        3          4m1s
hpademo   Deployment/hpademo   145%/50%        1         10        3          4m16s
hpademo   Deployment/hpademo   150%/50%        1         10        3          4m31s
hpademo   Deployment/hpademo   143%/50%        1         10        3          4m46s
hpademo   Deployment/hpademo   144%/50%        1         10        3          5m1s
hpademo   Deployment/hpademo   143%/50%        1         10        3          5m16s
hpademo   Deployment/hpademo   143%/50%        1         10        3          5m31s
hpademo   Deployment/hpademo   149%/50%        1         10        3          5m46s
hpademo   Deployment/hpademo   132%/50%        1         10        3          6m1s
hpademo   Deployment/hpademo   120%/50%        1         10        3          6m16s
hpademo   Deployment/hpademo   107%/50%        1         10        3          6m31s
hpademo   Deployment/hpademo   87%/50%         1         10        3          6m47s
hpademo   Deployment/hpademo   82%/50%         1         10        3          7m2s
hpademo   Deployment/hpademo   53%/50%         1         10        3          7m17s
hpademo   Deployment/hpademo   51%/50%         1         10        3          7m32s
hpademo   Deployment/hpademo   29%/50%         1         10        3          7m47s
hpademo   Deployment/hpademo   27%/50%         1         10        3          8m2s
hpademo   Deployment/hpademo   10%/50%         1         10        3          8m17s
hpademo   Deployment/hpademo   2%/50%          1         10        3          8m32s
hpademo   Deployment/hpademo   1%/50%          1         10        3          8m47s
hpademo   Deployment/hpademo   0%/50%          1         10        3          9m2s
hpademo   Deployment/hpademo   0%/50%          1         10        3          12m
hpademo   Deployment/hpademo   0%/50%          1         10        2          12m
hpademo   Deployment/hpademo   0%/50%          1         10        2          13m
hpademo   Deployment/hpademo   0%/50%          1         10        1          13m
Clean up
Once you are done with your testing run
oc delete all --all to clean up all the artifacts and oc delete project workshop-scale-up-down-YourName to delete the project
Summary
In this lab we have learnt to manually scale up and scale down, and idle the application. We have also learnt to use horizontal pod autoscaler to autoscale the application based on the workload.